 脚手架搭建
脚手架搭建
# 脚手架搭建
# Gitee 地址
easy-web: 一个快速初始化SpringBoot项目的脚手架 (gitee.com) (opens new window)
# 1、项目初始化
# 1.1 创建一个 Spring Boot 新项目
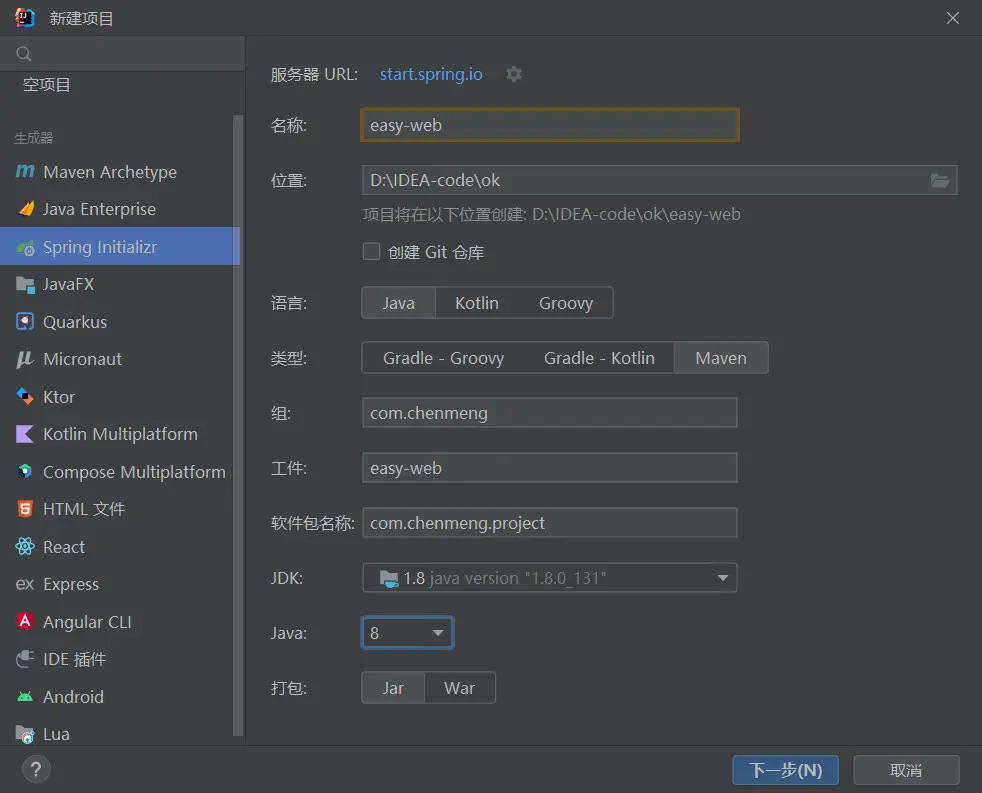
# 1.2 选择项目版本和依赖
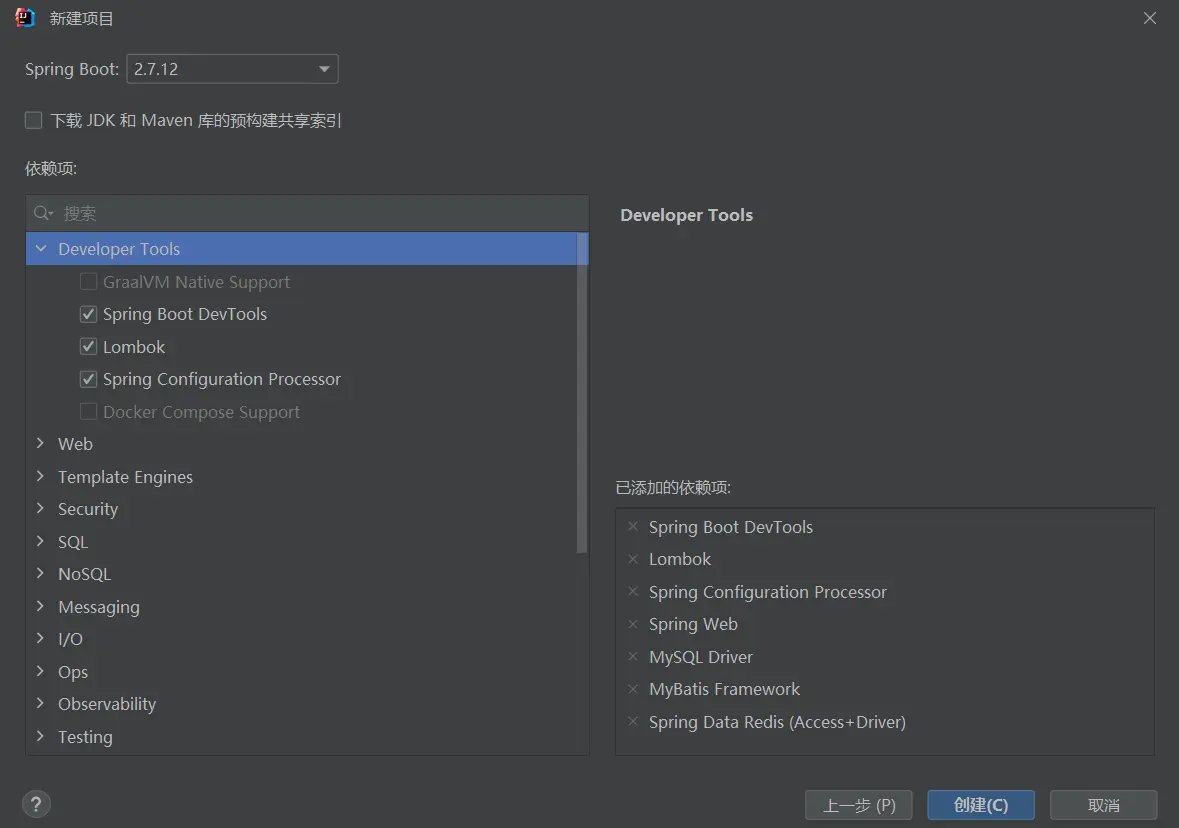
# 1.3 该配置文件为 .yml 格式

# 2、数据库表设计
用户表(注:以下字符集是 MySQL 8 版本的)
CREATE TABLE `user` (
  `id` bigint NOT NULL AUTO_INCREMENT COMMENT 'id',
  `user_account` varchar(256) CHARACTER SET utf8mb4 COLLATE utf8mb4_0900_ai_ci NOT NULL COMMENT '登录账号',
  `user_password` varchar(512) CHARACTER SET utf8mb4 COLLATE utf8mb4_0900_ai_ci NOT NULL COMMENT '密码',
  `user_name` varchar(256) CHARACTER SET utf8mb4 COLLATE utf8mb4_0900_ai_ci DEFAULT NULL COMMENT '用户昵称',
  `user_avatar` varchar(1024) CHARACTER SET utf8mb4 COLLATE utf8mb4_0900_ai_ci DEFAULT NULL COMMENT '用户头像',
  `gender` tinyint DEFAULT '0' COMMENT '性别:0 - 未知;1 - 男;2 -女',
  `phone` varchar(255) CHARACTER SET utf8mb4 COLLATE utf8mb4_0900_ai_ci DEFAULT NULL COMMENT '手机号码',
  `email` varchar(255) CHARACTER SET utf8mb4 COLLATE utf8mb4_0900_ai_ci DEFAULT NULL COMMENT '邮箱',
  `user_role` varchar(256) CHARACTER SET utf8mb4 COLLATE utf8mb4_0900_ai_ci NOT NULL DEFAULT 'user' COMMENT '用户角色:user - 普通用户;admin - 管理员',
  `user_status` varchar(255) CHARACTER SET utf8mb4 COLLATE utf8mb4_0900_ai_ci NOT NULL DEFAULT '0' COMMENT '用户状态:0 - 正常;1 - 禁用',
  `create_time` datetime NOT NULL DEFAULT CURRENT_TIMESTAMP COMMENT '创建时间',
  `update_time` datetime NOT NULL DEFAULT CURRENT_TIMESTAMP ON UPDATE CURRENT_TIMESTAMP COMMENT '更新时间',
  `is_delete` tinyint NOT NULL DEFAULT '0' COMMENT '是否删除:0 - 未删;1 - 已删',
  PRIMARY KEY (`id`) USING BTREE,
  UNIQUE KEY `uni_userAccount` (`user_account`) USING BTREE
) ENGINE=InnoDB AUTO_INCREMENT=26 DEFAULT CHARSET=utf8mb4 COLLATE=utf8mb4_0900_ai_ci ROW_FORMAT=DYNAMIC COMMENT='用户表';
2
3
4
5
6
7
8
9
10
11
12
13
14
15
16
17
# 3、Mybatis X 插件自动生成代码
# 1.1
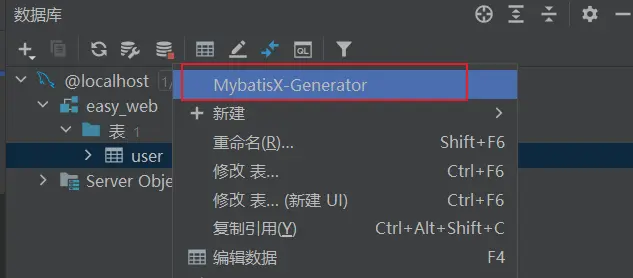
# 1.2
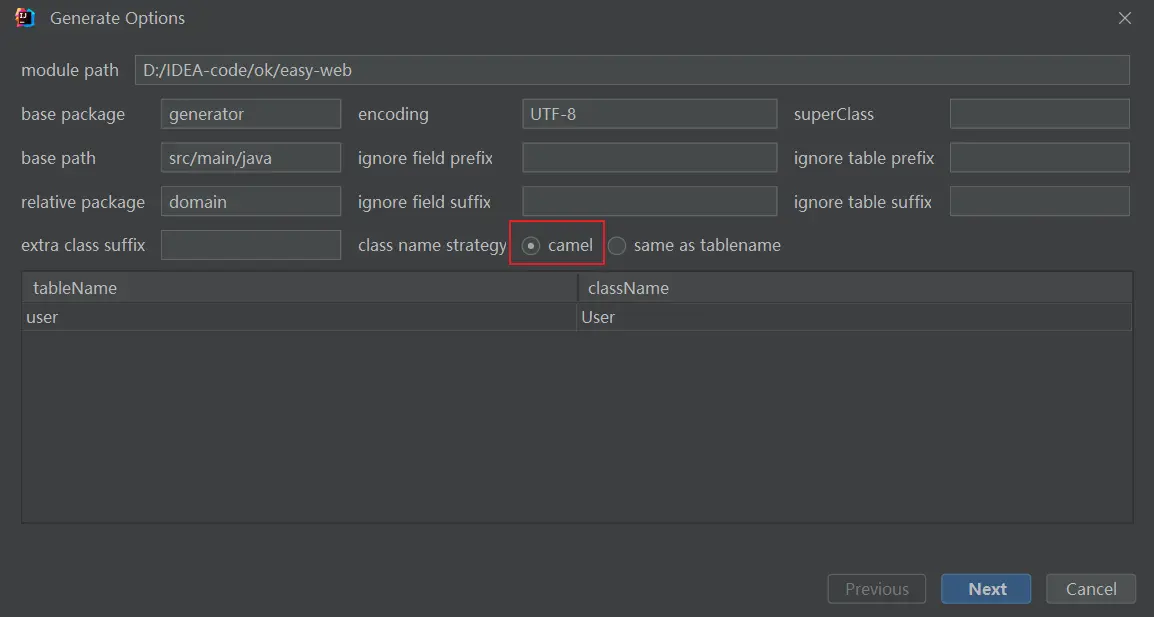
# 1.3
取消勾选 toString

# 1.4 生成的结果
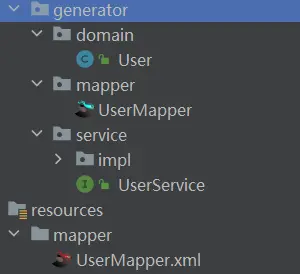
将需要的代码拖进对应的软件包即可,导入 mybatis-plus 依赖
        <dependency>
            <groupId>com.baomidou</groupId>
            <artifactId>mybatis-plus-boot-starter</artifactId>
            <version>3.5.1</version>
        </dependency>
2
3
4
5
# 选项解释
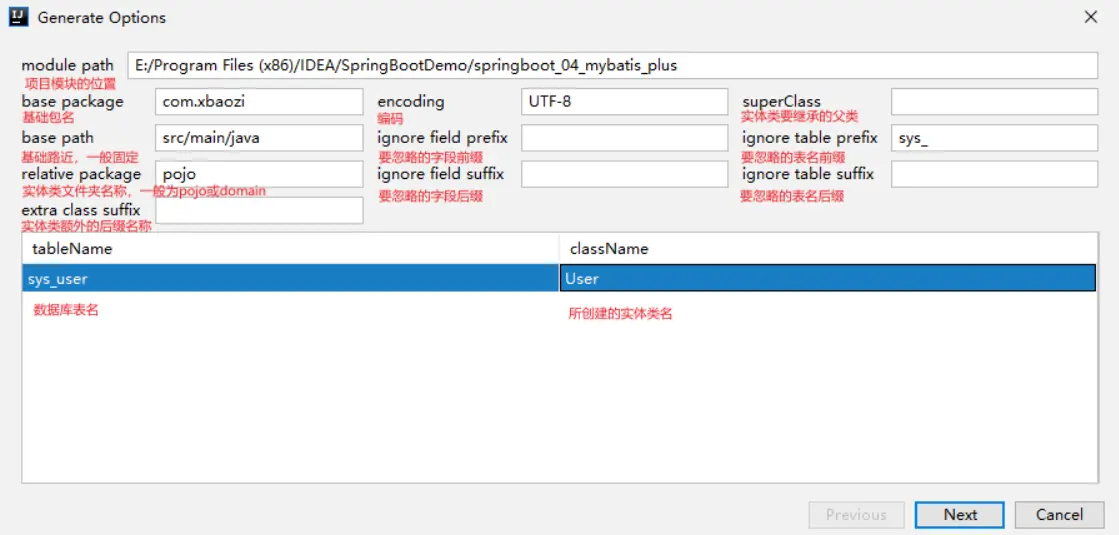
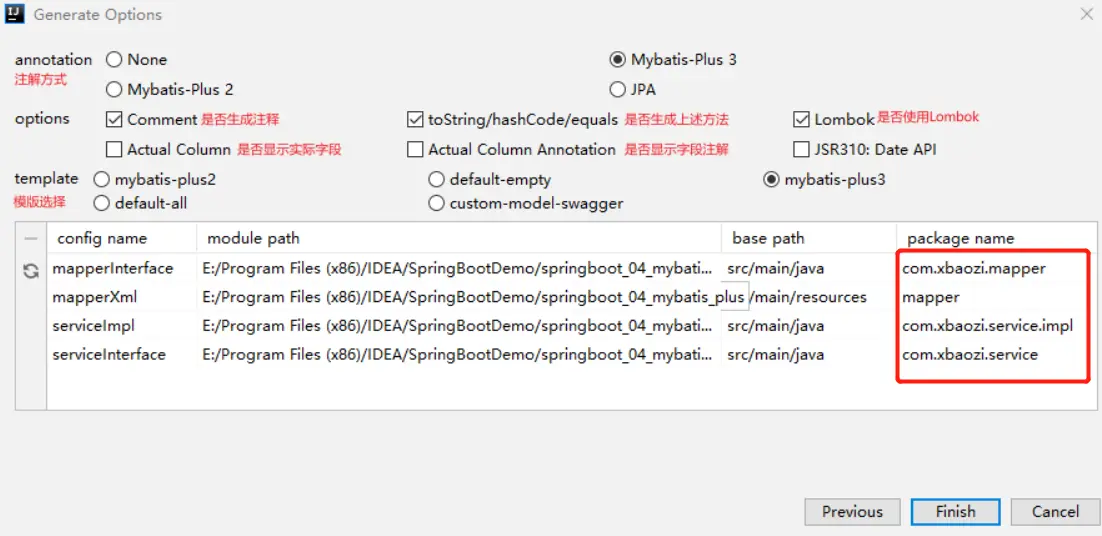
# 4、定义统一错误码
这是一个枚举类,用于定义系统中可能出现的错误码和对应的错误信息。
枚举值必须是私有且不可变
可以参考下阿里巴巴 Java 开发手册:
https://github.com/alibaba/p3c (opens new window)
public enum ErrorCode {

    SUCCESS(0, "ok"),

    PARAMS_ERROR(40000, "请求参数错误"),

    NOT_LOGIN_ERROR(40100, "未登录"),

    NO_AUTH_ERROR(40101, "无权限"),

    NOT_FOUND_ERROR(40400, "请求的数据不存在"),

    FORBIDDEN_EEOR(40300, "禁止访问"),

    SYSTEM_ERROR(50000, "系统内部异常"),

    OPERTATION_ERROR(50001, "操作失败");

    /**
     * 状态码
     */
    private final int code;

    /**
     * 信息
     */
    private final String message;

    ErrorCode(int code, String message) {
        this.code = code;
        this.message = message;
    }

    /**
     * 获取错误状态码
     *
     * @return int
     */
    public int getCode() {
        return code;
    }

    /**
     * 获取错误响应信息
     *
     * @return {@code String}
     */
    public String getMessage() {
        return message;
    }

}
2
3
4
5
6
7
8
9
10
11
12
13
14
15
16
17
18
19
20
21
22
23
24
25
26
27
28
29
30
31
32
33
34
35
36
37
38
39
40
41
42
43
44
45
46
47
48
49
50
51
52
# 5、创建通用返回类
@Data
public class BaseResponse<T> implements Serializable {

    private int code; // 状态码

    private T data; // 数据

    private String message; // 响应信息

    public BaseResponse(int code, T data, String message) {
        this.code = code;
        this.data = data;
        this.message = message;
    }

    public BaseResponse(int code, T data) {
        this(code, data, "");
    }

    public BaseResponse(ErrorCode errorCode) {
        this(errorCode.getCode(), null, errorCode.getMessage());
    }
}
2
3
4
5
6
7
8
9
10
11
12
13
14
15
16
17
18
19
20
21
22
23
# 6、异常处理
- 自定义异常类
public class BusinessException extends RuntimeException {

    private final int code;

    public BusinessException(int code, String message) {
        super(message);
        this.code = code;
    }

    public BusinessException(ErrorCode errorCode) {
        super((errorCode.getMessage()));
        this.code = errorCode.getCode();
    }

    public BusinessException(ErrorCode errorCode, String message) {
        super(message);
        this.code = errorCode.getCode();
    }

    public int getCode() {
        return code;
    }

}
2
3
4
5
6
7
8
9
10
11
12
13
14
15
16
17
18
19
20
21
22
23
24
- 全局异常处理
@RestControllerAdvice
@Slf4j
public class GlobalExceptionHandler {

    @ExceptionHandler(BusinessException.class)
    public BaseResponse<?> businessExceptionHandler(BusinessException e) {
        log.error("businessException: " + e.getMessage(), e);
        return ResultUtils.error(e.getCode(), e.getMessage());
    }

    @ExceptionHandler(RuntimeException.class)
    public BaseResponse<?> runtimeExceptionHandler(RuntimeException e) {
        log.error("runtimeException", e);
        return ResultUtils.error(ErrorCode.SYSTEM_ERROR, e.getMessage());
    }
}
2
3
4
5
6
7
8
9
10
11
12
13
14
15
16
@RestControllerAdvice 的作用:
它结合了 @ControllerAdvice 和 @ResponseBody 两个注解的功能,用于全局异常处理和返回统一的格式化响应数据。
当控制器中抛出异常时,@RestControllerAdvice 会捕获这些异常,并根据异常类型返回相应的数据格式。我们可以在 @ExceptionHandler 注解下定义多个异常处理方法,每个方法处理一个或多个不同类型的异常。这些方法可以返回不同类型的数据,如 JSON、视图或其他对象。
除了异常处理,@RestControllerAdvice 还可以在控制器方法执行前或执行后执行一些操作,例如记录日志、数据验证等。
# 7、定义用户常量
避免使用魔法值
public interface UserConstant {

    /**
     * 用户登录态键
     */
    String USER_LOGIN_STATE = "userLoginState";

    /**
     * 系统用户 id(虚拟用户)
     */
    long SYSTEM_USER_ID = 0;

    //  region 权限

    /**
     * 默认权限
     */
    String DEFAULT_ROLE = "user";

    /**
     * 管理员权限
     */
    String ADMIN_ROLE = "admin";

    // endregion
}
2
3
4
5
6
7
8
9
10
11
12
13
14
15
16
17
18
19
20
21
22
23
24
25
26
# 8、返回结果工具类
public class ResultUtils {

    /**
     * 成功
     *
     * @param data 数据
     * @return {@code BaseResponse<T>}
     */
    public static <T> BaseResponse<T> success(T data) {
        return new BaseResponse<>(0, data, "ok");
    }

    /**
     * 失败
     *
     * @param errorCode 错误码
     * @return
     */
    public static BaseResponse error(ErrorCode errorCode) {
        return new BaseResponse<>(errorCode);
    }

    /**
     * 失败
     *
     * @param code 状态码
     * @param message 信息
     * @return
     */
    public static BaseResponse error(int code, String message) {
        return new BaseResponse(code, null, message);
    }

    /**
     * 失败
     *
     * @param errorCode 错误码
     * @param message 信息
     * @return
     */
    public static BaseResponse error(ErrorCode errorCode, String message) {
        return new BaseResponse(errorCode.getCode(), null, message);
    }
}
2
3
4
5
6
7
8
9
10
11
12
13
14
15
16
17
18
19
20
21
22
23
24
25
26
27
28
29
30
31
32
33
34
35
36
37
38
39
40
41
42
43
44
# 9、分层领域模型规约
DO(Data Object):此对象与数据库表结构一一对应,通过 DAO 层向上传输数据源对象。DTO(Data Transfer Object):数据传输对象,Service 或 Manager 向外传输的对象。BO(Business Object):业务对象,可以由 Service 层输出的封装业务逻辑的对象。Query:数据查询对象,各层接收上层的查询请求。注意超过 2 个参数的查询封装,禁止使用 Map 类来传输。VO(View Object):显示层对象,通常是 Web 向模板渲染引擎层传输的对象。
# 10、userAccount.intern()
userAccount.intern() 是 Java 中的字符串常量池方法,它的作用是将字符串对象添加到字符串常量池中,并返回该字符串对象在常量池中的引用。如果常量池中已经存在该字符串,则直接返回该字符串在常量池中的引用。
- 当我们使用字符串字面量(例如:
String userAccount = "admin")创建字符串时,Java 虚拟机会自动将其添加到字符串常量池中,因此这种方式创建的字符串对象在常量池中只会存在一份。 - 而当我们通过
new关键字创建字符串时(例如:String userAccount = new String("admin")),则会在堆内存中创建一个新的字符串对象,该对象不会被添加到常量池中。
在实际开发中,我们可以使用 intern() 方法在运行时将堆中的字符串对象添加到常量池中,以便更有效地利用内存。但需要注意的是,由于常量池是在运行时被创建的,因此在使用 intern() 方法时需要注意字符串的生命周期,以避免不必要的内存消耗。
        synchronized (userAccount.intern()) {
            // 3. 加密
            String encryptPassword = DigestUtils.md5DigestAsHex((SALT + newPassword).getBytes());
            // 4. 更新数据
            user.setUserPassword(encryptPassword);
            boolean result = this.updateById(user);
            if (!result) {
                throw new BusinessException(ErrorCode.SYSTEM_ERROR, "密码找回失败,数据库错误");
            }
            // 5. 返回用户id
            return user.getId();
        }
2
3
4
5
6
7
8
9
10
11
12
# 11、分页查询
userVOPage.setRecords(userVOList)
这段代码是将一个 List 列表中的元素设置到一个分页对象(Page)中的记录(records)属性中。
通过调用 userVOPage 的 setRecords 方法,将 userVOList 列表中的元素设置到 userVOPage 的记录属性中,从而实现了将查询结果封装成一个分页对象的功能。这样,就可以将分页查询结果返回给前端展示,方便用户进行浏览和操作。
public Page<UserVO> listUserByPage(UserQueryRequest userQueryRequest, HttpServletRequest request) {
        long current = 1; // 默认当前页为第一页
        long size = 10; // 默认每页查询10条数据

        User userQuery = new User(); // 创建用户查询对象
        if (userQueryRequest != null) { // 如果查询请求参数不为空
            BeanUtils.copyProperties(userQueryRequest, userQuery); // 将请求参数拷贝到用户查询对象中
            current = userQueryRequest.getCurrent(); // 获取当前页数
            size = userQueryRequest.getPageSize(); // 获取每页查询记录数
        }

        LambdaQueryWrapper<User> lambdaQueryWrapper = new LambdaQueryWrapper<>(); // 创建Lambda查询条件对象
        Page<User> userPage = this.page(new Page<>(current, size), lambdaQueryWrapper); // 分页查询用户信息
        Page<UserVO> userVOPage = new PageDTO<>(userPage.getCurrent(), userPage.getSize(), userPage.getTotal()); // 创建用户VO分页对象

        List<UserVO> userVOList = userPage.getRecords().stream().map(user -> {
            UserVO userVO = new UserVO(); // 创建用户VO对象
            BeanUtils.copyProperties(user, userVO); // 将用户信息拷贝到用户VO对象中
            return userVO;
        }).collect(Collectors.toList()); // 将用户VO对象转化为List集合

        // 将userVOList列表中的元素设置到userVOPage的记录(recodes)属性中
        userVOPage.setRecords(userVOList);
        return userVOPage;
}
2
3
4
5
6
7
8
9
10
11
12
13
14
15
16
17
18
19
20
21
22
23
24
25
# 12、分页插件配置
@Configuration
@MapperScan("com.chenmeng.project.mapper")
public class MyBatisPlusConfig {

    /**
     * 拦截器配置
     *
     * @return
     */
    @Bean
    public MybatisPlusInterceptor mybatisPlusInterceptor() {
        MybatisPlusInterceptor interceptor = new MybatisPlusInterceptor();
        // 分页插件
        interceptor.addInnerInterceptor(new PaginationInnerInterceptor(DbType.MYSQL));
        return interceptor;
    }
}
2
3
4
5
6
7
8
9
10
11
12
13
14
15
16
17
# 13、Knife4j 接口文档配置
推荐根据官方文档为主:快速开始 | Knife4j (xiaominfo.com) (opens new window)
knife4j 是为 Java MVC 框架集成 Swagger 生成 Api 文档的增强解决方案,前身是 swagger-bootstrap-ui,取名 knife4j 是希望它能像一把匕首一样小巧、轻量,并且功能强悍。其底层是对 Springfox 的封装,使用方式也和 Springfox 一致,只是对接口文档 UI 进行了优化。
参考博客:
Swagger与Knife4j的学习 (opens new window)
1、导入依赖
        <!-- https://doc.xiaominfo.com/knife4j/documentation/get_start.html-->
        <dependency>
            <groupId>com.github.xiaoymin</groupId>
            <artifactId>knife4j-spring-boot-starter</artifactId>
            <version>3.0.3</version>
        </dependency>
2
3
4
5
6
2、指定 MVC 匹配路径 - yml 文件中(SpringBoot 2.6版本之后需要)
spring:
	mvc:
    pathmatch:
      # 指定URL路径匹配的策略--Ant--风格,默认的URL路径匹配的策略是AntPathMatcher
      matching-strategy: ANT_PATH_MATCHER
2
3
4
5
不指定的话会报错:Failed to start bean 'documentationPluginsBootstrapper'; nested exception is java.lang.NullPointerException
原因:在配置 Swagger 后,
springBoot 处理映射匹配的默认策略发生了变化,Spring MVC 处理映射匹配的默认策略已从 AntPathMatcher 更改为 PathPatternParser。
参考博客:
https://blog.csdn.net/Shipley_Leo/article/details/129100908 (opens new window)
3、写配置文件
@Configuration
@EnableSwagger2
@Profile("dev")
public class Knife4jConfig {

    @Bean
    public Docket defaultApi2() {
        return new Docket(DocumentationType.SWAGGER_2)
                .apiInfo(new ApiInfoBuilder()
                        .title("project-backend")
                        .description("后端接口项目文档")
                        .version("1.0")
                        .build())
                .select()
                // 指定 Controller 扫描包路径
                .apis(RequestHandlerSelectors.basePackage("com.chenmeng.project.controller"))
                .paths(PathSelectors.any())
                .build();
    }
}
2
3
4
5
6
7
8
9
10
11
12
13
14
15
16
17
18
19
20
4、显示以下页面表示配置成功
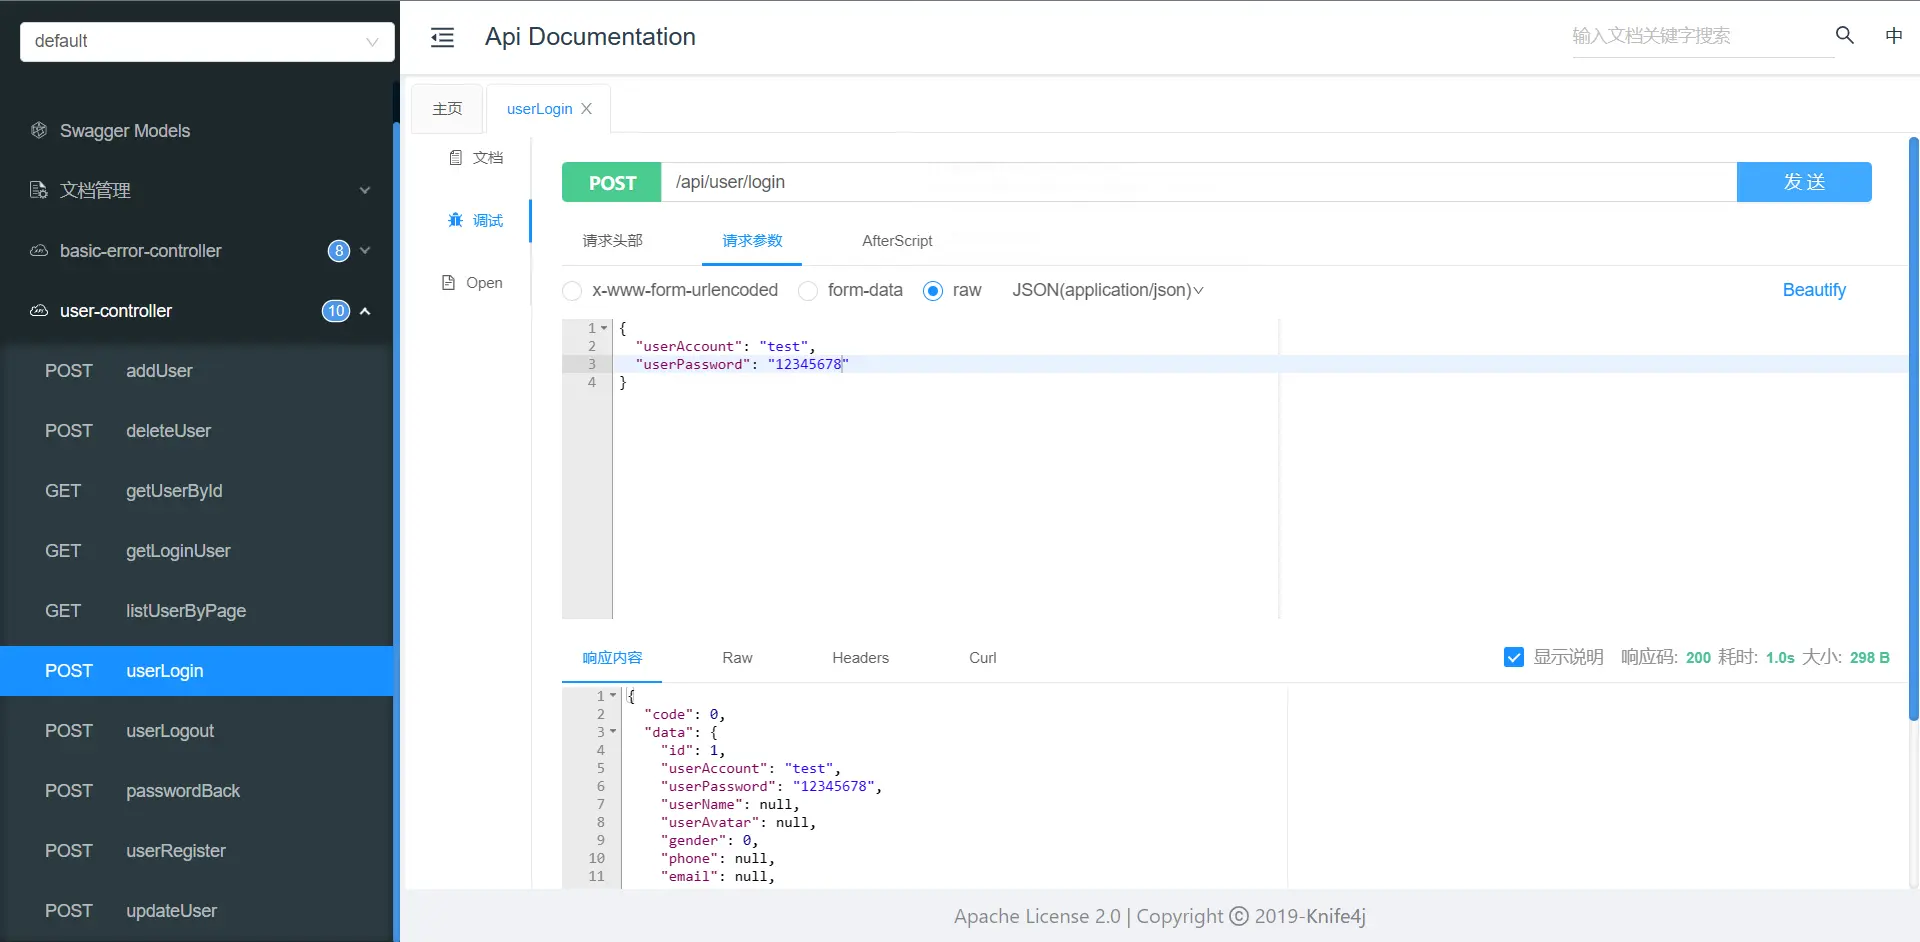
# 14、全局跨域配置
@Configuration
public class CorsConfig implements WebMvcConfigurer {

    @Override
    public void addCorsMappings(CorsRegistry registry) {
        // 覆盖所有请求
        registry.addMapping("/**")
                // 允许发送 Cookie
                .allowCredentials(true)
                // 放行哪些域名(必须用 patterns,否则 * 会和 allowCredentials 冲突)
                .allowedOriginPatterns("*")
                .allowedMethods("GET", "POST", "PUT", "DELETE", "OPTIONS")
                .allowedHeaders("*")
                .exposedHeaders("*");
    }
}
2
3
4
5
6
7
8
9
10
11
12
13
14
15
16
# 15、自定义权限校验注解
@Target(ElementType.METHOD) // 表示该注解只能添加在方法上
@Retention(RetentionPolicy.RUNTIME) // 表示该注解在运行时可用
public @interface AuthCheck {

    /**
     * 有任何一个角色
     *
     * @return {@code String[]}
     */
    String[] anyRole() default "";

    /**
     * 必须有某个角色
     *
     * @return {@code String}
     */
    String mustRole() default "";

}
2
3
4
5
6
7
8
9
10
11
12
13
14
15
16
17
18
19
# 16、AOP
首先需要导入 AOP 依赖
        <dependency>
            <groupId>org.springframework.boot</groupId>
            <artifactId>spring-boot-starter-aop</artifactId>
        </dependency>
2
3
4
1、权限校验拦截器 AOP
@Aspect
@Component
public class AuthInterceptor {

    @Resource
    private UserService userService;

    /**
     * 执行拦截
     *
     * @param joinPoint 连接点,即被拦截到的方法
     * @param authCheck 自定义注解 - 身份验证检查
     * @return {@code Object}
     */
    @Around("@annotation(authCheck)")
    public Object doInterceptor(ProceedingJoinPoint joinPoint, AuthCheck authCheck) throws Throwable {
        // 获取 @AuthCheck 注解的 anyRole 属性值,并将 非空字符串 添加到列表中。
        List<String> anyRole = Arrays.stream(authCheck.anyRole()).filter(StringUtils::isNotBlank).collect(Collectors.toList());
        // 获取 @AuthCheck 注解的 mustRole 属性值
        String mustRole = authCheck.mustRole();
        // 获取当前请求的属性
        RequestAttributes requestAttributes = RequestContextHolder.currentRequestAttributes();
        // 获取当前请求对象
        HttpServletRequest request = ((ServletRequestAttributes) requestAttributes).getRequest();
        // 获取当前登录用户
        User user = userService.getLoginUser(request);
        // 拥有任意权限即可通过
        if (CollectionUtils.isNotEmpty(anyRole)) { // 判断 anyRole 列表是否非空
            String userRole = user.getUserRole();
            if (!anyRole.contains(userRole)) {
                throw new BusinessException(ErrorCode.NO_AUTH_ERROR);
            }
        }
        // 必须拥有所有权限才可通过
        if (StringUtils.isNotBlank(mustRole)) { // 判断 mustRole 列表是否非空
            String userRole = user.getUserRole();
            if (!mustRole.equals(userRole)) {
                throw new BusinessException(ErrorCode.NO_AUTH_ERROR);
            }
        }
        // 通过权限校验,放行
        return joinPoint.proceed();
    }
}
2
3
4
5
6
7
8
9
10
11
12
13
14
15
16
17
18
19
20
21
22
23
24
25
26
27
28
29
30
31
32
33
34
35
36
37
38
39
40
41
42
43
44
@Aspect 注解和 @Around 注解,用于拦截带有 @AuthCheck 注解的方法,进行身份验证校验。
@Aspect注解表示这是一个切面类,用于定义切点和通知。@Component注解表示这个类是一个 Spring 组件,需要被 Spring 容器管理。@Around("@annotation(authCheck)")表示它拦截带有@AuthCheck注解的方法,并在方法执行前进行身份验证校验。
AuthCheck authCheck 表示被拦截方法上的 @AuthCheck 注解对象。
2、请求响应日志拦截器 AOP
@Aspect
@Component
@Slf4j
public class LogInterceptor {

    /**
     * 执行拦截
     *
     * @param point 连接点
     * @return {@code Object}
     * @throws Throwable throwable
     */
    @Around("execution(* com.chenmeng.project.controller.*.*(..))")
    public Object doInterceptor(ProceedingJoinPoint point) throws Throwable {
        // 计时
        StopWatch stopWatch = new StopWatch();
        stopWatch.start();
        // 获取请求路径
        RequestAttributes requestAttributes = RequestContextHolder.currentRequestAttributes();
        HttpServletRequest httpServletRequest = ((ServletRequestAttributes) requestAttributes).getRequest();
        // 生成请求唯一 id
        String requestId = UUID.randomUUID().toString();
        String url = httpServletRequest.getRequestURI();
        // 获取请求参数
        Object[] args = point.getArgs();
        String reqParam = "[" + StringUtils.join(args, ", ") + "]";
        // 输出请求日志
        log.info("request start,id: {}, path: {}, ip: {}, params: {}", requestId, url,
                httpServletRequest.getRemoteHost(), reqParam);
        // 执行原方法
        Object result = point.proceed();
        // 输出响应日志
        stopWatch.stop();
        long totalTimeMillis = stopWatch.getTotalTimeMillis();
        log.info("request end, id: {}, cost: {}ms", requestId, totalTimeMillis);
        return result;
    }
}
2
3
4
5
6
7
8
9
10
11
12
13
14
15
16
17
18
19
20
21
22
23
24
25
26
27
28
29
30
31
32
33
34
35
36
37
38
# 过滤器、拦截器、AOP
层面归属:
- 过滤器 -- 属于 Servlet 容器层面(比如 Tomcat 服务器)
- 拦截器和切面编程(AOP) -- 属于 Web 框架层面(Spring 框架)
流程:
客户端发起请求 -> Servlet 容器 -> Web 框架 -> 控制器(Controller)
HTTP 请求
    → 过滤器(Filter)链
        → DispatcherServlet
            → 拦截器(Interceptor)链
                → Controller 方法
                    → AOP(切面)
                        → Service 方法
2
3
4
5
6
7
优先级:
过滤器 > 拦截器 > AOP(Spring Bean 方法级别)
视频讲解:
Java后端,每周一个编程技巧,积累自己的知识库!结合实例说明过滤器、拦截器、切面编程三者的区别 (opens new window)
# 依赖解析
<?xml version="1.0" encoding="UTF-8"?>
<project xmlns="http://maven.apache.org/POM/4.0.0" xmlns:xsi="http://www.w3.org/2001/XMLSchema-instance"
         xsi:schemaLocation="http://maven.apache.org/POM/4.0.0 https://maven.apache.org/xsd/maven-4.0.0.xsd">
    <modelVersion>4.0.0</modelVersion>
    <parent>
        <groupId>org.springframework.boot</groupId>
        <artifactId>spring-boot-starter-parent</artifactId>
        <version>2.7.12</version>
        <relativePath/> <!-- lookup parent from repository -->
    </parent>
    <groupId>com.chenmeng</groupId>
    <artifactId>easy-web</artifactId>
    <version>0.0.1-SNAPSHOT</version>
    <name>easy-web</name>
    <description>Spring Boot 后端项目脚手架</description>
    <properties>
        <java.version>1.8</java.version>
    </properties>
    <dependencies>
        <dependency>
            <groupId>com.baomidou</groupId>
            <artifactId>mybatis-plus-boot-starter</artifactId>
            <version>3.5.1</version>
        </dependency>
        <!--commons-lang3工具类-->
        <dependency>
            <groupId>org.apache.commons</groupId>
            <artifactId>commons-lang3</artifactId>
            <version>3.12.0</version>
        </dependency>
        <!--hutool工具类-->
        <dependency>
            <groupId>cn.hutool</groupId>
            <artifactId>hutool-all</artifactId>
            <version>5.8.18</version>
        </dependency>
        <!-- swagger + knife4j 接口文档-->
        <dependency>
            <groupId>com.github.xiaoymin</groupId>
            <artifactId>knife4j-spring-boot-starter</artifactId>
            <version>3.0.3</version>
        </dependency>
        <!-- gson解析库 -->
        <dependency>
            <groupId>com.google.code.gson</groupId>
            <artifactId>gson</artifactId>
            <version>2.9.0</version>
        </dependency>
        <!--AOP-->
        <dependency>
            <groupId>org.springframework.boot</groupId>
            <artifactId>spring-boot-starter-aop</artifactId>
        </dependency>

        <dependency>
            <groupId>org.springframework.boot</groupId>
            <artifactId>spring-boot-starter-data-redis</artifactId>
        </dependency>
        <dependency>
            <groupId>org.springframework.boot</groupId>
            <artifactId>spring-boot-starter-web</artifactId>
        </dependency>
        <dependency>
            <groupId>org.mybatis.spring.boot</groupId>
            <artifactId>mybatis-spring-boot-starter</artifactId>
            <version>2.3.1</version>
        </dependency>

        <!-- devtools热部署依赖 -->
        <dependency>
            <groupId>org.springframework.boot</groupId>
            <artifactId>spring-boot-devtools</artifactId>
            <!-- 防止将依赖传递到其他模块中 -->
            <optional>true</optional>
            <!-- 只在运行时起作用,打包时不打进去(防止线上执行打包后的程序,启动文件监听线程File Watcher,耗费大量的内存资源) -->
            <scope>runtime</scope>
        </dependency>
        <dependency>
            <groupId>com.mysql</groupId>
            <artifactId>mysql-connector-j</artifactId>
            <scope>runtime</scope>
        </dependency>
        <dependency>
            <groupId>org.springframework.boot</groupId>
            <artifactId>spring-boot-configuration-processor</artifactId>
            <optional>true</optional>
        </dependency>
        <dependency>
            <groupId>org.projectlombok</groupId>
            <artifactId>lombok</artifactId>
            <optional>true</optional>
        </dependency>
        <dependency>
            <groupId>org.springframework.boot</groupId>
            <artifactId>spring-boot-starter-test</artifactId>
            <scope>test</scope>
        </dependency>
    </dependencies>

    <build>
        <plugins>
            <plugin>
                <groupId>org.springframework.boot</groupId>
                <artifactId>spring-boot-maven-plugin</artifactId>
                <configuration>
                    <excludes>
                        <exclude>
                            <groupId>org.projectlombok</groupId>
                            <artifactId>lombok</artifactId>
                        </exclude>
                    </excludes>
                </configuration>
            </plugin>
        </plugins>
    </build>

</project>
2
3
4
5
6
7
8
9
10
11
12
13
14
15
16
17
18
19
20
21
22
23
24
25
26
27
28
29
30
31
32
33
34
35
36
37
38
39
40
41
42
43
44
45
46
47
48
49
50
51
52
53
54
55
56
57
58
59
60
61
62
63
64
65
66
67
68
69
70
71
72
73
74
75
76
77
78
79
80
81
82
83
84
85
86
87
88
89
90
91
92
93
94
95
96
97
98
99
100
101
102
103
104
105
106
107
108
109
110
111
112
113
114
115
116
117
# 1、热部署依赖
spring-boot-devtools 提供以下功能:
- 自动应用程序重启:在开发应用程序时,当我们对代码进行更改并保存后,应用程序将自动重新启动,以便更快地查看更改的结果,而无需手动重启应用程序。
- LiveReload 支持:当我们更改 HTML、CSS、JavaScript 文件时,LiveReload 将自动重新加载浏览器页面,以便更快地查看更改的结果。
- 全局默认属性设置:在开发期间,我们可能需要设置一些默认属性,例如开启调试模式,禁用缓存等。
spring-boot-devtools提供了一种简单的方式来设置这些属性,以便在整个应用程序中生效。
需要注意的是,
spring-boot-devtools只应该在开发环境中使用,不应该在生产环境中使用。因为在生产环境中,自动重启和 LiveReload 可能会导致应用程序的性能下降,甚至可能会引起一些安全问题。热部署:https://www.jianshu.com/p/de544b13b9d5 (opens new window)
注册器参数设置解析
首先在 IDEA 中,按 Ctrl + Alt + Shift + /(或 Cmd + Option + Shift + / on macOS)打开 Registry。
compiler.automake.build.while.idle.timeout是 IntelliJ IDEA 的注册表(Registry)中的一项设置。这个设置项控制的是在系统空闲状态下,IDEA 自动构建项目的等待时间。compiler.automake.postpone.when.idle.less.than是 IntelliJ IDEA 注册表(Registry)中的另一个设置项,它控制了在系统空闲时间小于特定值时是否延迟自动构建。
注意事项
请注意,这种自动构建可能会对系统的资源使用产生影响,尤其是在大型项目中。如果你发现系统响应变慢或者 CPU 使用率过高,可以尝试调低这个设置值或关闭自动构建功能。
# 2、gson 解析依赖库
Gson 是 Google 提供的一个 Java 库,用于将 Java 对象和 JSON 数据相互转换。它可以将一个 Java 对象序列化为 JSON 格式的字符串,也可以将一个 JSON 格式的字符串反序列化为一个 Java 对象。
Gson 支持 Java 中的基本数据类型、集合类型和自定义对象类型,并且可以对 Java 对象进行自定义序列化和反序列化操作。
        <!-- https://mvnrepository.com/artifact/com.google.code.gson/gson -->
        <dependency>
            <groupId>com.google.code.gson</groupId>
            <artifactId>gson</artifactId>
            <version>2.9.0</version>
        </dependency>
2
3
4
5
6
可以看看下面这篇文章:
