 Vue3入门
# Vue3 入门
# Vue3 简介
菜鸟教程:https://www.runoob.com/vue3/vue3-install.html
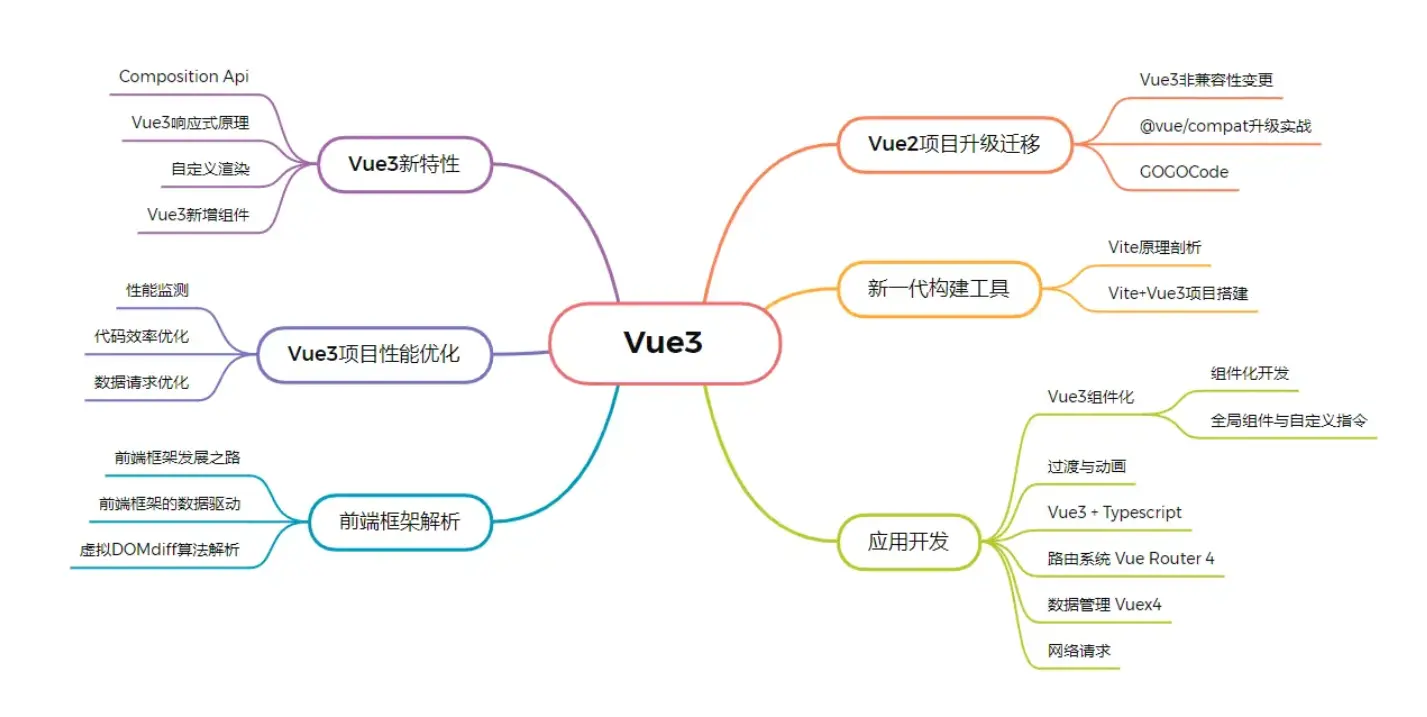
从 2020 年 9 月份 Vue3.0 发布以来,经过近两年的发展补充,Vue3 的生态圈逐步完善,已经成熟到足以支撑日常项目的研发。
而且,Vue3 在 Vue2 的基础上引入了 Typescript 重构了大量的代码,增加了很多新的特性,并发布了新一代的工程化工具 vite 。这些新的改动,让 Vue3 对我们的研发变得更加友好。
# Vue3 对研发更友好
让我们来看一下,同样的项目,使用 vite 作为开发构建工具的 Vue3 和使用 vue-cli 的 Vue2 的运行对比。
| 构建工具 | 启动时间 | 打包时间 |
|---|---|---|
| vite | 135ms | 13025ms |
| vue-cli | 1482ms | 28186ms |
从上面的表格我们可以看到,vite 相对比 vue-cli 来说,启动项目时间缩短达到了 10 倍,打包时间也明显减小。
同时,Vue3 也提高了编译的效率。以往当我们的项目越来越大时,经常是一个小小的改动,甚至需要等待几分钟的编译时间才能看到页面效果。而 vite 内部使用了 Esbuild 作为底层的依赖预编译工具,完全发挥了 Go 语言和多线程的优势,同时利用现代浏览器原生支持 ESM 特性,完全省略了打包的过程,极大的提高了编译运行的效率(关于 vite,我们会在其他章节详细介绍,这里只需要有个印象就可以了)。
除了 vite 这个新工具以外,从代码层面,Vue3 的 Composition Api 新特性也让我们的项目代码功能结构更加清晰,组件拆分复用更加灵活。
从框架层面,Vue3 框架的本身也使用 proxy 代替 Object.defineProperty 重新实现了真正的响应式“代理”,并且将渲染逻辑拆分为【浏览器渲染】和【平台无关渲染】,这对于我们的跨端,跨框架组合开发来说有着非同凡响的意义,你能想象在 React 中使用 Vue 的响应式吗,Vue3 就替你创造了这个可能性。
综上可见,Vue3 做了如此多的改变,从编译运行、代码语法、框架结构等多个层面同时发力,给研发提供了编译更快、打包体积更小、写法更清晰的直观感受,那我们又有什么理由去拒绝 Vue3 呢?
# 如何学习 Vue3?
大部分的同学应该都有过 Vue 的相关开发经验,而且 Vue 也是流行框架中出了名的简单易学,所以从 Vue2 到 Vue3 的升级远远没有想象的那么困难。
相信有部分同学阅读过 Vue 原理的相关文章,比如响应式的实现原理,使用了 Object.defineProperty 进行拦截代理等等,而在 Vue3 中,设计者们对部分功能的原理进行了重构调整,我们在学习的过程中,可以从两个方面来深入剖析。
- 在纵向上,与 Vue2 的实现原理进行对比。
这样可以帮助我们深刻的理解 Vue3 的新特性原理,新语法为什么要这么实现,同时也能更清楚 Vue2 的缺陷和短板,进一步的拓宽我们的知识面。
如果大家过去只是单纯地使用 Vue2,只是根据文档按部就班的进行开发,那么通过 Vue3.0 再次学习的过程,我们可以从原理到基础 api,再到 vue-router、Vuex 的引入,认真体会下 Vue3 的渐进式设计。
- 在横向上,与现有的热门框架 React , Angular 等对比,深入理解各个框架的侧重点和特色。
这样可以进一步地体会 Vue 本身的设计理念和均衡的特性,以及各个框架的优缺点,我们可以更好地明白各个框架的定位以及如何去根据项目来选择一个合适的前端框架。
其实每个框架都有自己的核心点,只要抓住框架的几个重点,就像搭帐篷一样,就能支撑起我们自己的框架思维,学会去搭建自己的框架思维,那后面如果再有 Vue4,Vue5 或者其他新的框架,对于我们来说,都可以很快去接受并使用它们。
# Vue 能做啥?
我们知道,HTML 文档是由节点构成的集合。HTML 文件节点包括【元素节点、文本节点和属性节点】。下面请仔细观察 HTML 文件的页面结构。
<!DOCTYPE html>
<html>
  <head>
    <meta charset="UTF-8">
    <title>Vue3.0篇</title>
  </head>
  <body>
    <h1>说编程</h1>
    <a href="demo1.html">个人简介</a>
  </body>
</html>
2
3
4
5
6
7
8
9
10
11
# 1 文档结构
# 1.1 HTML是一棵树
观察了 HTML 页面结构之后,细心的你会发现:"HTML 是一棵树"!
没错,HTML 就是一棵由 HTML 标签组成的树。树干是 <html> 标签,树枝是节点,树叶是属性,树花是文本。
# 1.2 浏览器如何砍树
为了方便浏览器,砍(解析) HTML 这棵树,W3C(万维网联盟)定义了访问 HTML 的 DOM 标准。DOM(Document Object Model)文档对象模型,定义了所有 HTML 元素的对象和属性,以及访问它们的方法。
JS 操作 DOM 时,浏览器会从构建 DOM 树开始从头到尾执行一遍流程(意味着每一次操作都需要重新计算)。比如在用户一次操作中,他/她需要更新 10 个 HTML 元素(DOM节点)内容时,浏览器在收到第 1 个 DOM 请求后并不知道还有 9 次更新操作,因此会马上执行流程,最终执行了 10 次操作。
在第 1 次计算完之后,紧接着下一个 DOM 更新请求时,之前节点的坐标值就变了。那么,进行第 2 次计算时,之前的操作相当于做了无用功,白白浪费了性能。频繁操作还会出现页面卡顿,影响用户体验的问题。
# 1.3 在性能优化之后
为了解决 DOM 访问 HTML 文件时存在的性能问题,一帮技术牛人就开始琢磨......
在 2009 年时,经过 Misko Hevery 等人的努力,终于研究出了一种 diff 算法,实现了那里需要更新就更新那里的愿望,为了方便分享喜悦,Misko Hevery 等人对其进行了扩展、升级、包装并给它取了一个好听的名字:AngularJS。
为了方便、保障 AngularJS 能更好的用到谷歌产品中,谷歌对其进行了收购。于是,一款有着诸多特性,核心功能的是 MVC(Model–view–controller)、模块化、自动化双向数据绑定、语义化标签、依赖注入等等的优秀前端 JS 框架,由此诞生了。
# 1.4 为何有 Vue
在 Angular 流行的那些年,好多程序员都投入了好多精力去学习,也不管 Angular 的 MVC 是否全部都能用得上。其实就算知道了,也无可奈何,理由你懂的。
直到 2013,就职于 Google Creative Lab,名叫尤雨溪的帅哥的出现,程序员用前端 JS 框架,才发现根本不需要那么累。
尤大大由于个人兴趣,对 Angular 进行了改造,去掉了 Angular MVC 中的 MV,只留下 V(View) 的内容。为了方便记忆,将其取名为 Vue.js。
Vue.js(读音 /vjuː/, 类似于 view) 是一套构建用户界面的渐进式框架。Vue 核心只关注视图层,采用自底向上增量开发的设计,目标是通过尽可能简单的 API 实现响应式的数据绑定和组合的视图组件。
Vue 从最初的实验阶段(2013年中到2014年2月),0.x 阶段 (2014年2月到2015年10月),1.x 阶段 (2015年10月到2016年9月),2.x 阶段(2016年9月至2019年上半年),到今天的 3.x 阶段,已经有足足 9 年多的时间了。
# 感受 Vue3
# 1 如何使用 Vue
在使用 <script> 标签引入 Vue 的情况下,有两种引入方式:
通过 CDN 地址引入
或直接本地 Vue.js 文件引入。
如果进行单文件组件(SFC)开发,则要复杂些,不是用 vite,就是用 CLI 脚手架。
对于初学者,建议从 <script> 标签引入 Vue 开始学习。
<script src="https://unpkg.com/vue@next"></script>
就是引用 CDN 的方式。从 https 名字,你就知道,这是引用网上的资源(受网络环境影响)。可网络差或断网的话,怎么办,不学了?
所以,也可以回到以前的传统方法,就是直接到:
https://cdn.jsdelivr.net/npm/vue@3.3.4/dist/ (opens new window)
下载 vue.global.js 文件,然后在要用 Vue 的 HTML 文件中引用就好了!
<script src="vue.global.js"></script>
# 2 Vue3 倍轻松
在 Vue3 中,每个 Vue 应用都是通过用 createApp 函数创建一个新的应用实例开始的,这种统一的应用方式,让你学起来更加轻松。
学习 Vue 3,就是对其生命周期中的函数,有的放矢,加加减减,或独立或联合。生命周期图,你不用记忆,也不用背诵,浏览一下就好,后面会逐步讲解的。
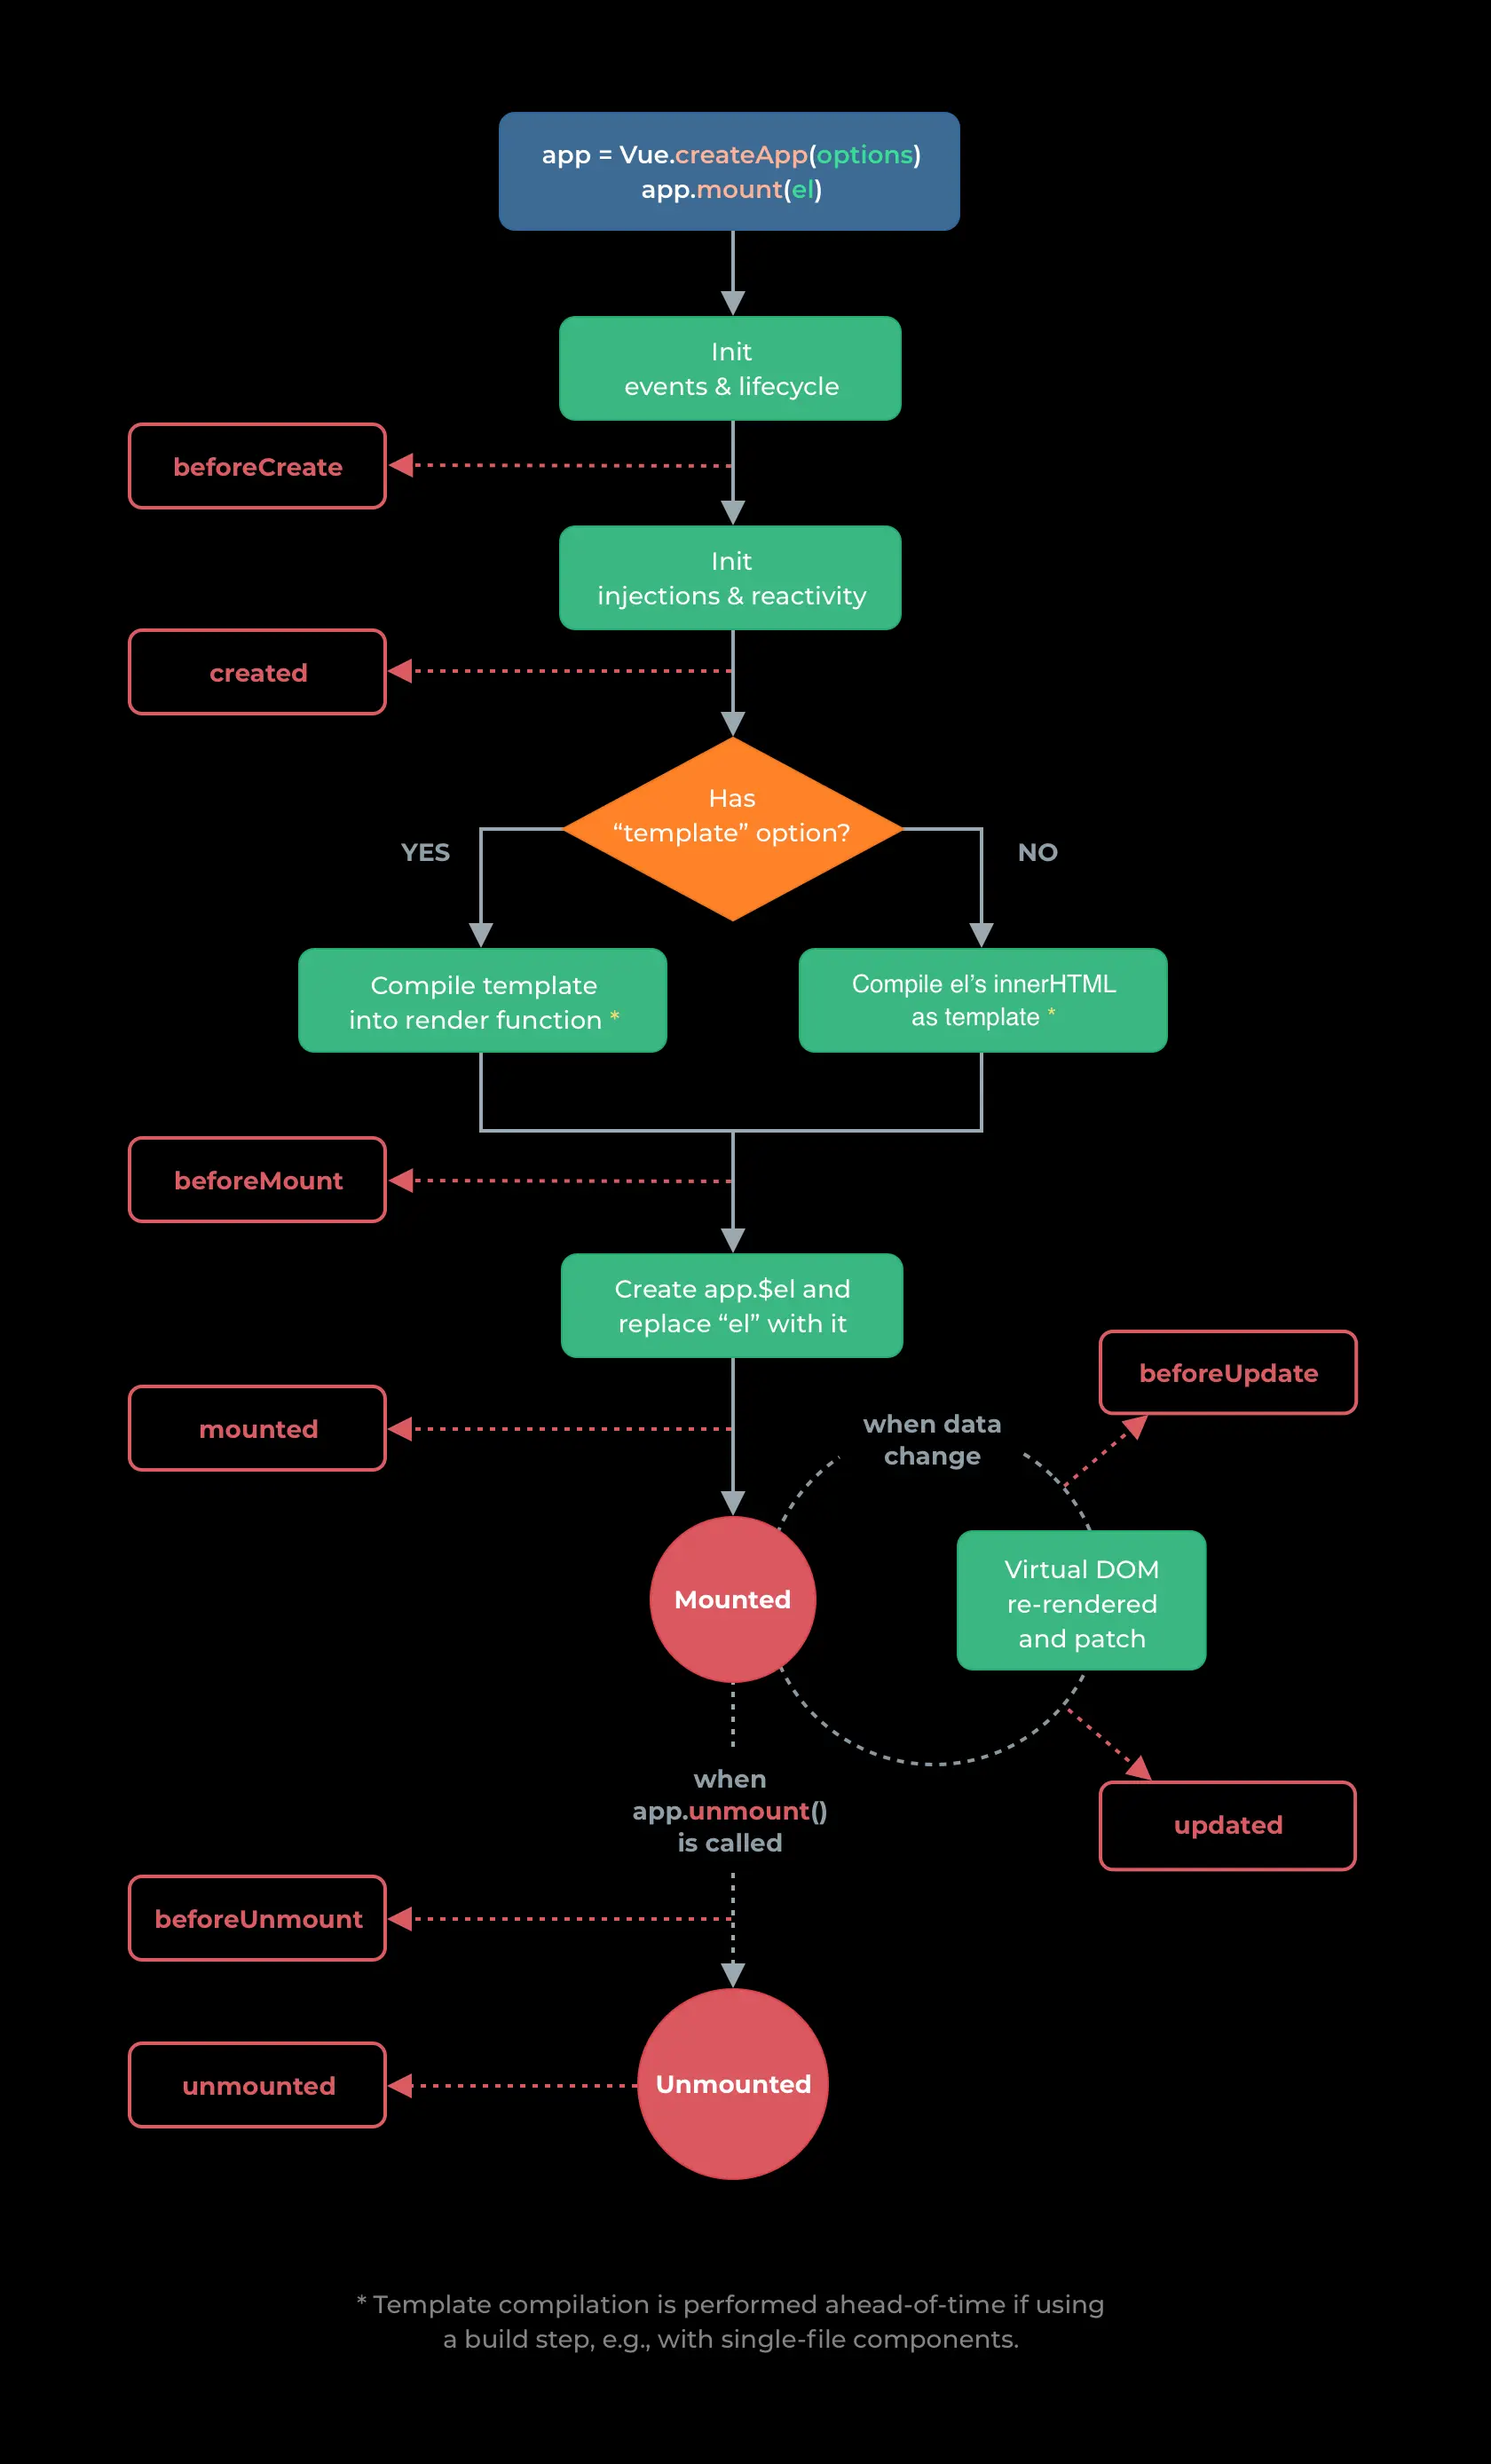
用第 1 个框图中的
createApp和mount搞个样例,让代码飘一会。
<!DOCTYPE html>
<html>

<head>
    <meta charset="UTF-8">
    <title>第1个vue 3程序</title>
    <style>
        .hello_div {
            border: 1px solid darkgreen;
            border-radius: 15px;
            width: 850px;
            line-height: 50px;
            text-align: center;
        }
    </style>
    <script src="vue.global.js"></script>
</head>

<body>
    <div id="hello" class="hello_div"> 你好,{{ msg }} </div>
    <script>
        // 传统html写法
        // let msg = 'vue.js 3'
        // // 找对人
        // let helloDiv = document.getElementById('hello')
        // // 做对事
        // helloDiv.innerText = `你好,${msg}`
        const vue = Vue.createApp({
            data() {
                return { msg: "vue 3" }
            }
        })
        vue.mount("#hello") </script>
</body>

</html>
2
3
4
5
6
7
8
9
10
11
12
13
14
15
16
17
18
19
20
21
22
23
24
25
26
27
28
29
30
31
32
33
34
35
36
输出结果

# 3 Vue3 三步曲
应用 Vue3,可按三步曲进行:
- 创建 Vue 实例;
- 定义将要赋予元素的数据;
- 将数据和元素进行绑定。
定下这个调调之后,后面就是学习它的【语法(模板、条件和组件等)和生命周期函数的应用】了。
为了方便和提高代码的可读性,定义数据和 Vue 实例,常常放在一起声明。为了让你更清晰 Vue 的意义,我就来个数据绑定的例子。
<!DOCTYPE html>
<html>
<head>
    <meta charset="UTF-8">
    <title>第2个vue 3程序</title>
    <style>
        .input_div {
            border: 1px solid darkgreen;
            border-radius: 15px;
            width: 850px;
            line-height: 50px;
            text-align: center;
        }

        input {
            border: 1px solid salmon;
            width: 200px;
            height: 22px;
        }
    </style>
    <script src="vue.global.js"></script>
</head>

<body>
    <div id="hello" class="input_div">
      	<input id="name" v-model="msg" placeholder="hello" />
        <p>想学编程的人,快点来,<strong>{{ msg }}</strong>world。</p>
    </div>
    <script>
        // 第1步:创建vue实例
        // 第2步:定义数据
        // 第3步:绑定元素
        Vue.createApp({
            data() {
                return { msg: '' }
            }
        }).mount("#hello")
    </script>
</body>

</html>
2
3
4
5
6
7
8
9
10
11
12
13
14
15
16
17
18
19
20
21
22
23
24
25
26
27
28
29
30
31
32
33
34
35
36
37
38
39
40
41
# 核心语法
想学一门编程语言,就要先整明白它的语法规则。Vue 使用了基于 HTML 的模板语法,允许开发者声明式地将 DOM 绑定至底层组件实例的数据。所有 Vue 的模板都是合法的 HTML,所以能被遵循规范的浏览器和 HTML 解析器解析。
# 1 文本插值
数据绑定最常见的形式就是使用双大括号 {{}} 的文本插值,如果你要用不常见的,那可用 <span v-text=""></span> 的方式。
在 Vue 中,带有 v- 前缀的特殊属性,称为指令。
无论选择哪一个插值方式绑定到组件(HTML标签)上,在组件实例上的值发生了改变,插值处的内容都会更新,这便是数据驱动的方式。
<!DOCTYPE html>
<html>

<head>
    <meta charset="UTF-8">
    <title>Vue3.0核心语法</title>
    <script src="vue.global.js"></script>
</head>

<body>
    <div id="hello">
      <input id="name" v-model="msg" placeholder="输入文本内容" />
      <p>用双大括号实现文本插值:{{ msg }}</p>
      <p>用v-text指定实现插值:<span v-text="msg"></span></p>
    </div>
    <script>
        // 第1步:data数据;
        // 第2步:vue实例,
        // 第3步:绑定元素
        Vue.createApp({
            data() {
                return { msg: '' }
            }
        }).mount("#hello")
    </script>
</body>

</html>
2
3
4
5
6
7
8
9
10
11
12
13
14
15
16
17
18
19
20
21
22
23
24
25
26
27
28
# 2 原始 HTML
在开发过程中,有时会输出有格式的动态内容,比如输出带颜色文本。如果用插值的方式,输出的为文本内容,显然满足不了要求。这时就要用到 v-html 指令了。
温馨提醒:原始 HTML,尽量不要用在输入上,因为它很容易导致 XSS 攻击。
XSS 攻击通常指的是:通过利用网页开发时留下的漏洞,通过巧妙的方法注入恶意指令代码到网页中。
<!DOCTYPE html>
<html>

  <head>
    <meta charset="UTF-8">
    <title>Vue3.0核心语法</title>
    <script src="vue.global.js"></script>
  </head>

  <body>
    <div id="vh">
      <p>文本插值结果: {{ msg }}</p>
      <p>原始HTML结果: <span v-html="msg"></span></p>
    </div>
    <script>
      // 第1步:data数据;
      // 第2步:vue实例,
      // 第3步:绑定元素
      Vue.createApp({
        data() {
          return {
            msg: '<span style="color: red">vue.js 3.0</span>'
          }
        }
      }).mount("#vh")
    </script>
  </body>

</html>
2
3
4
5
6
7
8
9
10
11
12
13
14
15
16
17
18
19
20
21
22
23
24
25
26
27
28
29
# 3 属性绑定
在 Vue 中,
- 对 HTML 属性的绑定,采用
v-bind(可缩写为":")指令, - 对事件的绑定,采用
v-on(可缩写为"@")指令。
这里说下 v-bind 的应用,v-on 在讲事件时再细讲。
你可能会奇怪,绑定属性有什么用?我随便举一个例子,你就秒懂了。
当美女程序员看我的文章时,系统就给她推荐有漂亮图表的文章链接地址;当男性程序员看我的文章时,系统就给推荐有漂亮MM的文章链接地址,以此来提高阅读量。
<!-- 完整语法 --> <a v-bind:href="url"> ... </a>
<!-- 缩写 --> <a :href="url"> ... </a>
<!DOCTYPE html>
<html>

  <head>
    <meta charset="UTF-8">
    <title>Vue3.0核心语法</title>
    <script src="vue.global.js"></script>
  </head>

  <body>
    <div id="vh">
      <p>文本插值结果: {{ msg }}</p>
      <p>原始HTML结果: <span v-html="msg" ></span></p>
      <a :href="site">跳转</a>
    </div>
    <script>
      // 第1步:data数据;
      // 第2步:vue实例,
      // 第3步:绑定元素
      Vue.createApp({
        data() {
          return {
            msg: '<span style="color: red">vue.js 3.0</span>',
            site: 'http://www.sohu.com'
          }
        }
      }).mount("#vh")
    </script>
  </body>

</html>
2
3
4
5
6
7
8
9
10
11
12
13
14
15
16
17
18
19
20
21
22
23
24
25
26
27
28
29
30
31
# 条件渲染和 template
所谓的条件,指的就是满足什么条件,允许做什么事,不满足时,是不允许做的。如共享单车,规定满 12 周岁或以上才可以骑行,没满的则不被允许。学每门编程语言,条件语句都是必须熟练掌握的,Vue3.0 的也不例外。
# 1 v-if 指令
在 Vue3.0 中,条件语句是通过 v-if 指令实现的。
如果判断条件为 True,就执行 v-if 语句里的内容,否则什么都不执行。
<!DOCTYPE html>
<html>

<head>
    <meta charset="UTF-8">
    <title>vue3.0条件语法</title>
    <script src="vue.global.js"></script>
</head>

<body>
    <div id="app">
        <h1 v-if='cool'>前端编程</h1>
    </div>
    <script>
        Vue.createApp({
            data() {
                return { cool: true }
            }
        }).mount("#app")
    </script>
</body>

</html>
2
3
4
5
6
7
8
9
10
11
12
13
14
15
16
17
18
19
20
21
22
23
如果 v-if 为 false 时,你不想输出空气,不想什么都不执行,那就其后面加上 v-else 指令。
v-if 和 v-else 搭在一起使用,规则是:v-if 的条件为 true 时,执行 v-if 里的内容,否则执行 v-else 里的。
<!DOCTYPE html>
<html>

<head>
    <meta charset="UTF-8">
    <title>vue3.0条件语法</title>
    <script src="vue.global.js"></script>
</head>

<body>
    <div id="app">
        <h1 v-if='cool'>前端编程</h1>
        <h1 v-else>不学前端,还可以学后端嘛</h1>
    </div>
    <script>
        Vue.createApp({
            data() {
                return { cool: false }
            }
        }).mount("#app") </script>
</body>

</html>
2
3
4
5
6
7
8
9
10
11
12
13
14
15
16
17
18
19
20
21
22
23
<!DOCTYPE html>
<html>

<head>
    <meta charset="UTF-8">
    <title>vue3.0条件语法</title>
    <script src="vue.global.js"></script>
</head>

<body>
    <div id="app">
        <h1 v-if="program === 'Vue3.0'">vue3.0 很酷,很酷 </h1>
        <h1 v-else-if="program === '前端'">前端,很酷</h1>
        <h1 v-else-if="program === 'Java'">Java,很酷</h1>
        <h1 v-else-if="program === 'App'">App,很酷</h1>
        <h1 v-else>Python,也酷</h1>
    </div>
    <script>
        Vue.createApp({
            data() {
                return {
                    program: 'Vue3.0'
                }
            }
        }).mount("#app")
    </script>
</body>

</html>
2
3
4
5
6
7
8
9
10
11
12
13
14
15
16
17
18
19
20
21
22
23
24
25
26
27
28
29
# 2 template
长得有点(不是特别)酷的你,可能早就注意到了,v-if 指令,都是附加在一个元素上的;
如果想要实现切换多个元素,该如何?
可以将 v-if 放在 <template> 元素中。
<!DOCTYPE html>
<html>

<head>
    <meta charset="UTF-8">
    <title>vue3.0条件语法</title>
    <script src="vue.global.js"></script>
</head>

<body>
    <div id="app">
        <template v-if="show">
            <h1>编程</h1>
            <p>编程都用啥工具<br />
                工具不重要,重要的是思想<br />
                Python,前端(小程序)、Java和App 都是工具<br />
                用啥都可以好程序</p>
        </template>
    </div>
    <script>
        Vue.createApp({
            data() {
                return {
                    show: true
                }
            }
        }).mount("#app")
    </script>
</body>

</html>
2
3
4
5
6
7
8
9
10
11
12
13
14
15
16
17
18
19
20
21
22
23
24
25
26
27
28
29
30
31
# 3 v-show 指令
- 如果你要实现业务方面的条件判断,用
v-if指令就可以了; - 如果只是想切换一下 CSS 的内容,那你可以用
v-show指令。
v-show 只是简单地切换元素的 CSS 属性值,不支持 v-else,也不支持 <template> 元素,它常用于隐藏或显示某个元素。
<!DOCTYPE html>
<html>

<head>
    <meta charset="UTF-8">
    <title>vue3.0条件语法</title>
    <script src="vue.global.js"></script>
    <style>
        .show {
            margin-top: 20px;
            width: 600px;
            height: 50px;
            background: darkcyan;
        }
    </style>
</head>

<body>
    <div id="app">
        <input type="button" value="按下就报幕" v-on:click="show"> <br />
        <div class="show" v-show="report">报幕~~~</div>
    </div>
    <script>
        Vue.createApp({
            data() {
                return {
                    report: false
                }
            },
            methods: {
                show() {
                    this.report = true;
                }
            }
        }).mount("#app")
    </script>
</body>

</html>
2
3
4
5
6
7
8
9
10
11
12
13
14
15
16
17
18
19
20
21
22
23
24
25
26
27
28
29
30
31
32
33
34
35
36
37
38
39
# 循环渲染
开发一个Web系统,如果没有涉及到列表功能的话,那真的有点奇葩了,而循环输出列表内容,不用for循环语句的话,那我真不知道该用什么了。在Vue3.0中,v-for指令基于一个数组来渲染输出一个列表内容。
# 1 v-for 输出项
Vue 的 v-for 指令使用 item in items 形式的特殊语法,同其他编程语言(如Python)并没有多大区别。
其中 items 是源数据数组,而 item 则是被迭代的数组元素的别名。
<!DOCTYPE html>
<html>
<head>
    <meta charset="UTF-8">
    <title>Vue3.0循环语法</title>
    <script src="vue.global.js"></script>
    <style>
        .lang {
            border: 1px solid darkcyan;
            width: 600px;
            height: 200px;
        }
    </style>
</head>
<body>
<div class="lang">
    Vue.js 3.0 系列教程
    <ol id="program">
        <li v-for="item in items">
            {{ item.lang }}
        </li>
    </ol>
</div>
<script>
    Vue.createApp({
        data() {
            return {
                items: [{lang: 'Python'}, {lang: '前端'},
                    {lang: 'Vue3.0'}, {lang: 'koa2'},
                    {lang: 'Java'}, {lang: 'App'}]
            }
        }
    }).mount("#program")
</script>
</body>
</html>
2
3
4
5
6
7
8
9
10
11
12
13
14
15
16
17
18
19
20
21
22
23
24
25
26
27
28
29
30
31
32
33
34
35
36
# 2 索引和值
数据列表在表格输出时,常常需要用到序号。
v-for 指令支持输出下标,将下标+1,即可获得序号。
为了更接近 JavaScript 迭代器的语法,Vue3.0 支持用 of 替代 in 作为分隔。
<!DOCTYPE html>
<html>
<head>
    <meta charset="UTF-8">
    <title>Vue3.0循环语法</title>
    <script src="vue.global.js"></script>
    <style>
        h1 {
            text-align: center;
        }

        table {
            width: 600px;
            margin: 0 auto;
            text-align: center;
            height: 200px;
        }

        td, th {
            border: 1px solid #bcbcbc;
            padding: 5px 10px;
        }

        th {
            background: #42b983;
            font-size: 1.2rem;
            font-weight: 400;
            color: #fff;
            cursor: pointer;
        }

        tr:nth-of-type(odd) {
            background: #fff;
        }

        tr:nth-of-type(even) {
            background: #eee;
        }
    </style>
</head>
<body>
<h1>vue.js 3.0 系列教程</h1>
<table id="program">
    <thead>
    <tr>
        <th>序号</th>
        <th>编程语言</th>
        <th>备注</th>
    </tr>
    </thead>
    <tr v-for="(item,index) of items">
        <td>{{ index + 1 }}</td>
        <td>{{ item.lang }}</td>
        <td>{{ item.remark }}</td>
    </tr>
</table>

<script>
    Vue.createApp({
        data() {
            return {
                items: [
                    {lang: 'Python', remark: '入门、数据分析、爬虫'},
                    {lang: '前端', remark: '网页三贱客'},
                    {lang: 'Vue3.0', remark: '能在项目中应用'},
                    {lang: 'Koa2', remark: '企业实战项目'},
                    {lang: 'Java', remark: '从0开始入门'},
                    {lang: 'App', remark: '安卓和iOS等开发'}]
            }
        }
    }).mount("#program")
</script>
</body>
</html>
2
3
4
5
6
7
8
9
10
11
12
13
14
15
16
17
18
19
20
21
22
23
24
25
26
27
28
29
30
31
32
33
34
35
36
37
38
39
40
41
42
43
44
45
46
47
48
49
50
51
52
53
54
55
56
57
58
59
60
61
62
63
64
65
66
67
68
69
70
71
72
73
74
# 3 v-for 和 v-if
由于当 v-if 和 v-for 处于同一节点时,v-if 的优先级比 v-for 更高,这意味着 v-if 将没有权限访问 v-for 里的变量,就是说不可以将 v-if 和 v-for 放在同一个元素里。
<!-- v-for 和 v-if 不可以放在同一个元素内 -->
<li v-for="item in items" v-if="item==true">
    {{ good }}
</li>
2
3
4
为了解决 v-for 和 v-if 同一水平的问题,你可以把 v-for 移动到
<template>标签中进行修正。就是将 v-if 放到 v-for 内部去的意思。
<!DOCTYPE html>
<html>
<head>
    <meta charset="UTF-8">
    <title>Vue3.0循环语法</title>
    <script src="vue.global.js"></script>
    <style>
        h1 {
            text-align: center;
            color: darkorange;
        }

        table {
            width: 600px;
            margin: 0 auto;
            text-align: center;
            height: 200px;
        }

        td, th {
            border: 1px solid #bcbcbc;
            padding: 5px 10px;
        }

        th {
            background: #42b983;
            font-size: 1.2rem;
            font-weight: 400;
            color: #fff;
            cursor: pointer;
        }

        tr:nth-of-type(odd) {
            background: #fff;
        }

        tr:nth-of-type(even) {
            background: #eee;
        }
    </style>
</head>
<body>
<h1>Vue.js 3.0 系列教程</h1>
<table id="program">
    <thead>
    <tr>
        <th>序号</th>
        <th>编程语言</th>
        <th>完成情况</th>
    </tr>
    </thead>
    <template v-for="(item,index) in items">
        <tr>
            <td>
                {{ index + 1 }}
            </td>
            <td>
                {{ item.lang }}
            </td>
            <td>
                <span v-if="item.todo==1">
                    已完成
                </span>
                <span v-else-if="item.todo==2">
                 进行中
                </span>
                <span v-else>
                   将启动
                </span>
            </td>
        </tr>
    </template>
</table>
<script>
    Vue.createApp({
        data() {
            return {
                items: [
                    {lang: 'Python', todo: 1,},
                    {lang: '前端', todo: 1},
                    {lang: 'Vue3.0', todo: 2},
                    {lang: 'Koa2', todo: 3},
                    {lang: 'Java', todo: 3},
                    {lang: 'App', todo: 3}]
            }
        }
    }).mount("#program")
</script>
</body>
</html>
2
3
4
5
6
7
8
9
10
11
12
13
14
15
16
17
18
19
20
21
22
23
24
25
26
27
28
29
30
31
32
33
34
35
36
37
38
39
40
41
42
43
44
45
46
47
48
49
50
51
52
53
54
55
56
57
58
59
60
61
62
63
64
65
66
67
68
69
70
71
72
73
74
75
76
77
78
79
80
81
82
83
84
85
86
87
88
89
90
# 样式绑定
为了方便 CSS 对页面的美化,Vue3.0 特意提供了操作元素的 class 和内联样式的指令。
因为它们都是元素,所以我们可以用 v-bind(属性绑定) 进行处理。
由于字符串拼接麻烦且易错,所有 Vue3.0 在 v-bind 用于 class 和 style 时,做了专门的增强,表达式结果的类型除了字符串之外,还可以是对象或数组。
# 1 Class 指令
Vue 用 v-bind:class(简写为:class)指令,用于解决动态切换 class 的需求。
如果你不清楚用在什么哪方面的需求,就想一下提示信息的应用,在错误发生时,用红色字体,否则用绿色。
<!DOCTYPE html>
<html>
<head>
    <meta charset="UTF-8">
    <title>Vue3.0 class指令</title>
    <script src="vue.global.js"></script>
    <style>
        .b {
            font-weight: bold;
        }

        .error {
            color: red;
        }
    </style>
</head>
<body>
<span id="app">
<h1 class="b" :class="{ 'error': hasError }">红色字体,好看么?</h1>
</span>
<script>
    Vue.createApp({
        data() {
            return {
                hasError: true
            }
        }
    }).mount("#app") // 挂载后成为组件
</script>
</body>
</html>
2
3
4
5
6
7
8
9
10
11
12
13
14
15
16
17
18
19
20
21
22
23
24
25
26
27
28
29
30
31
渲染结果(生成的代码)
<h1 class="b error">红色字体,好看么?</h1>
思考:如何通过单击按钮来切换颜色?
<!DOCTYPE html>
<html>
<head>
    <meta charset="UTF-8">
    <title>Vue3.0 class指令</title>
    <script src="vue.global.js"></script>
    <style>
        .b {
            font-weight: bold;
        }

        .error {
            color: red;
        }
    </style>
</head>
<body>
<span id="app">
    <button @click="change">改变颜色</button>
	  <h1 class="b" :class="{ 'error': hasError }">红色字体,好看么?</h1>
</span>
<script>
    Vue.createApp({
        data() {
            return {
                hasError: true
            }
        },
        methods:{
            change(){
                this.hasError = !this.hasError
            }
        }
    }).mount("#app")
</script>
</body>
</html>
2
3
4
5
6
7
8
9
10
11
12
13
14
15
16
17
18
19
20
21
22
23
24
25
26
27
28
29
30
31
32
33
34
35
36
37
如果你想同时满足多个 class,你可以用 class 的数组语法。这个语法,可读性更强一些。
<!DOCTYPE html>
<html>
<head>
    <meta charset="UTF-8">
    <title>Vue3.0 class指令</title>
    <script src="vue.global.js"></script>
    <style>
        .b {
            font-weight: bold;
        }

        .big-text {
            font-size: 60px;
        }

        .error {
            color: red;
        }
    </style>
</head>
<body>
<span id="app">
<p class="b" :class="[fontSize, errorInfo]">
    程序员<br/>
    除了会编程之外,还会什么?<br/>
    当然是敲代码了。
</p>
</span>
<script>
    Vue.createApp({
        data() {
            return {
                fontSize: 'big-text',
                errorInfo: 'error'
            }
        }
    }).mount("#app")
</script>
</body>
</html>
2
3
4
5
6
7
8
9
10
11
12
13
14
15
16
17
18
19
20
21
22
23
24
25
26
27
28
29
30
31
32
33
34
35
36
37
38
39
40
渲染结果(生成的代码)
<span id="app"><p class="b big-text error"> 程序员<br>
  除了会编程之外,还会什么?<br> 当然是敲代码了。 </p></span>
2
你可以用三元表达式,根据条件切换列表中的 class。
<!DOCTYPE html>
<html>
<head>
    <meta charset="UTF-8">
    <title>Vue3.0 class指令</title>
    <script src="vue.global.js"></script>
    <style>
        .b {
            font-weight: bold;
            font-size: 50px;
        }

        .yes {
            color: #008CBA;
        }

        .no {
            color: red;
        }
    </style>
</head>
<body>
<span id="app">
<p class="b" :class="[isCool ? 'yes' :'no']">
    蓝色字体才好看。
</p>
</span>
<script>
    Vue.createApp({
        data() {
            return {
                isCool: true
            }
        }
    }).mount("#app")
</script>
</body>
</html>
2
3
4
5
6
7
8
9
10
11
12
13
14
15
16
17
18
19
20
21
22
23
24
25
26
27
28
29
30
31
32
33
34
35
36
37
38
# 2 内联样式
在 HTML 中,在元素上用 style 的话,结果是不可改变的,为此 Vue3.0 加上了:style 指令。
注意,你别看这个指令看起来十分直观,看着非常像 CSS,但其实是一个 JavaScript 对象来的。
<!DOCTYPE html>
<html>
<head>
    <meta charset="UTF-8">
    <title>Vue3.0 style指令</title>
    <script src="vue.global.js"></script>
</head>
<body>
<span id="app">
<p :style="{ color: textColor, fontSize: fontSize + 'px' }">
    程序员,都忙得跟狗一样,哈哈~
</p>
</span>
<script>
    Vue.createApp({
        data() {
            return {
                textColor: '#008CBA',
                fontSize: 50
            }
        }
    }).mount("#app")
</script>
</body>
</html>
2
3
4
5
6
7
8
9
10
11
12
13
14
15
16
17
18
19
20
21
22
23
24
25
你可以用样式对象的方式。这样的写法,是不是更舒服了一些,输出结果和上面是一模一样的。
<span id="app">
<p :style="styleOj">
    程序员,都忙得跟狗一样都忙得跟狗一样,哈哈~
</p>
</span>
<script>
    Vue.createApp({
        data() {
            return {
                styleOj: {
                    color: '#008CBA',
                    fontSize: '50px'
                }
            }
        }
    }).mount("#app")
</script>
2
3
4
5
6
7
8
9
10
11
12
13
14
15
16
17
既然
class可以用数组语法,:style当然也可以。
:style 的数组语法可以将多个样式对象应用到同一个元素上。输出结果和上面的还是一样的。
<span id="app">
<p :style="[textColor, fontSize]">
    程序员,都忙得跟狗一样,哈哈~
</p>
</span>
<script>
    Vue.createApp({
        data() {
            return {
                textColor: {
                    color: '#008CBA',
                },
                fontSize: {
                    'font-size': '50px'
                }
            }
        }
    }).mount("#app")
</script>
2
3
4
5
6
7
8
9
10
11
12
13
14
15
16
17
18
19
# 计算属性
在如今编程都提出 MVC、MVP 或 MVVM 等模式的情况下,已经很少再将业务逻辑和视图层合在一起。
在 Vue3.0 中,在 HTML(相当于视图层)插值方式是可以负责计算(相当于业务逻辑),但不提倡你这么用,因为 Vue3.0 有计算属性。
# 1 计算属性
将计算放置在模板中,模板将不再是简单的和声明性的,此时,你必须先看一下它,然后才能意识到它执行的计算取决于 chen.lang。如果要在模板中多次包含此计算,则问题会变得更糟。
所以,对于任何包含响应式数据的复杂逻辑,你都应该使用计算属性,听到了没?如果没有的话,那就看看代码吧。计算属性放在 computed 里面,函数放在 methods 里面。
<!DOCTYPE html>
<html>
<head>
    <meta charset="UTF-8">
    <title>Vue3.0计算属性</title>
    <script src="vue.global.js"></script>
</head>
<body>
<span id="app">
    <span>在插值中计算的结果:{{ chen.lang.length > 10 ? '太多了' : '还好' }}
    </span>
    <br/>
    <span>获取计算属性的结果:{{ langCount }}</span>
</span>
<script>
    Vue.createApp({
        data() {
            return {
                chen: {
                    name: 'IT界老家伙',
                    lang: [
                        'Python',
                        '前端',
                        '小程序',
                        'Java',
                        'Android App',
                        'iOS App'
                    ]
                }
            }
        },
        computed: {
            // 计算属性的 getter
            langCount() {
                return this.chen.lang.length > 10 ? '太多了' : '还好'
            }
        }
    }).mount("#app")
</script>
</body>
</html>
2
3
4
5
6
7
8
9
10
11
12
13
14
15
16
17
18
19
20
21
22
23
24
25
26
27
28
29
30
31
32
33
34
35
36
37
38
39
40
41
细心的朋友,可能就会问了,那我用函数计算行不行。如果不考虑性能的话,当然可以的。只是函数和计算属性的区别在于,计算属性有缓存的作用,而函数没有。
在操作过程中,如果内容没有改变,计算属性不会重新计算,而函数每次都会进行计算。用函数计算的代码,我发出来,你自己拷贝进去就好。
 <!--  新增函数计算部分  -->
    <br/>
    <span>函数计算属性的结果:{{ langFun() }}</span>
,
        methods: {
            // 函数中
            langFun() {
                return this.chen.lang.length > 10 ? '太多了' : '还好'
            }
        }
2
3
4
5
6
7
8
9
10
# 2 计算属性的 Setter
计算属性默认只有 getter,如果你想要一个 setter 的话,手动加上就好。
在函数里更新计算属性数据时,会调用 setter。你可以在 setter 里进行调整。
<!DOCTYPE html>
<html>
<head>
    <meta charset="UTF-8">
    <title>Vue3.0计算属性</title>
    <script src="https://unpkg.com/vue@next"></script>
</head>
<body>
<span id="app">
<p>{{ fullName }}</p>
<p>{{ firstName }}</p>
<p>{{ lastName }}</p>
<button @click="sayHello()">点击调用set方法</button>
</span>
<script>
    Vue.createApp({
        data() {
            return {
                firstName: '程',
                lastName: '绪媛'
            }
        },

        computed: {
            // 计算属性
            fullName: {
                //getter
                get() {
                    return this.firstName + '' + this.lastName
                },
                //setter
                set(newValue) {
                    const names = newValue.split('或')
                    this.firstName = names[0]
                    this.lastName = '没有' + names[names.length - 1]
                }
            }
        },
        methods: {
            // sayHello: function() {
            //     this.fullName = '程绪媛'
            // }
            sayHello() {
                this.fullName = '程绪媛'
            }
        },
    }).mount("#app")
</script>
</body>
</html>
2
3
4
5
6
7
8
9
10
11
12
13
14
15
16
17
18
19
20
21
22
23
24
25
26
27
28
29
30
31
32
33
34
35
36
37
38
39
40
41
42
43
44
45
46
47
48
49
50
运行结果
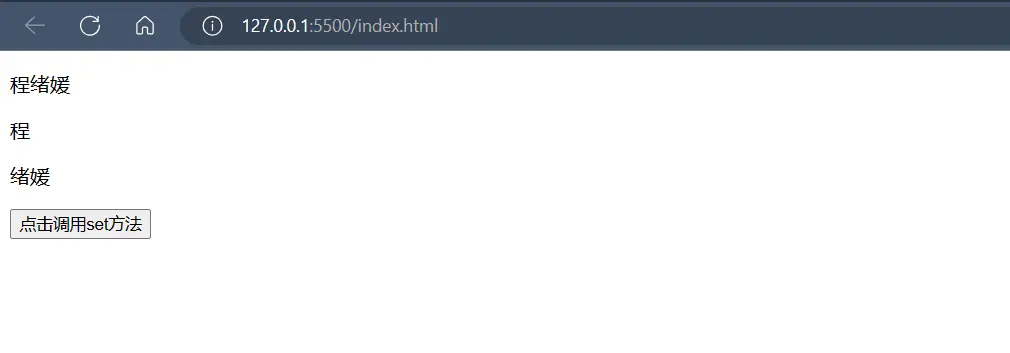
点击调用 set 方法后

# 事件处理
在 JavaScript 语言中,当用户与 UI 组件交互时,UI 组件能够激发一个相应事件。例如,用户按动按钮、滚动文本、移动鼠标或按下按键等,都将产生一个相应的事件。
Vue3.0 使用 v-on 指令(缩写为 @ 符号)来监听 DOM 事件,并在触发事件时执行一些 JavaScript 函数。
语法为 v-on:click="函数名" 或 @click="函数名"。
# 1 事件处理
如果你有看过前面的章节,应该知道响应用户操作事件的函数是放在 methods 里面的。
<!DOCTYPE html>
<html>
<head>
    <meta charset="UTF-8">
    <title>Vue3.0计算属性</title>
    <script src="vue.global.js"></script>
</head>
<body>
<span id="app">
<button @click="say">说点什么</button>
</span>
<script>
    Vue.createApp({
        data() {
        },

        methods: {
            say() {
               alert("艾边成,真酷!")
            }
        },
    }).mount("#app")
</script>
</body>
</html>
2
3
4
5
6
7
8
9
10
11
12
13
14
15
16
17
18
19
20
21
22
23
24
25
# 2 传递参数
Vue 事件绑定,除了支持直接绑定到一个方法外,也可以在内联 JavaScript 语句中调用方法。说白了,就是可以直接在函数中传递参数。
<!DOCTYPE html>
<html>
<head>
    <meta charset="UTF-8">
    <title>Vue3.0计算属性</title>
    <script src="vue.global.js"></script>
</head>
<body>
<span id="app">
<button @click="say('老陈说')">老陈说</button>
<br/><br/>
<button @click="say('老头说')">老头说</button>
</span>
<script>
    Vue.createApp({
        data() {
        },

        methods: {
            say(title) {
                alert(title + ",爱编程的人真酷!")
            }
        },
    }).mount("#app")
</script>
</body>
</html>
2
3
4
5
6
7
8
9
10
11
12
13
14
15
16
17
18
19
20
21
22
23
24
25
26
27
# 3 事件来源
如果界面上有多个按钮或表单,你想根据用户的不同操作,响应不同的事件,这时你可以通过监听事件源的方式进行处理。
在软件系统中,我们常常见到的打开、保存、导出、打印等多个按钮在同一个功能菜单时,就可以用这种方式。
<!DOCTYPE html>
<html>
<head>
    <meta charset="UTF-8">
    <title>Vue3.0计算属性</title>
    <script src="vue.global.js"></script>
    <style>
        .menu {
            border: 1px solid darkgreen;
            width: 100px;
            height: 150px;
            padding-top: 20px;
            padding-left: 20px;
        }
    </style>
</head>
<body>
<div class="menu" id="app">
    <button name="save" @click="opt">保存</button>
    <br/> <br/>
    <button name="open" @click="opt">打开</button>
    <br/> <br/>
    <button name="print" @click="opt">打印</button>
</div>
<script>
    Vue.createApp({
        data() {
        },
        methods: {
            opt(event) {
                let opt = event.target.name
                let src = event.target.tagName
                alert('知道你点了 ' + opt + ' '
                      + src + ',我马上处理.')
            }
        },
    }).mount("#app")
</script>
</body>
</html>
2
3
4
5
6
7
8
9
10
11
12
13
14
15
16
17
18
19
20
21
22
23
24
25
26
27
28
29
30
31
32
33
34
35
36
37
38
39
40
输出结果:

细心的人,可能会想到,如果想要监听事件源,又想要传递参数时,Vue 又当如何处理,不要急,你想到的,我也想到了,Vue 创始人也想到了。
传递参数时,将 $event 参数也传过去就好了。
<div class="menu" id="app">
    <button name="save" @click="opt('保存',$event)">保存</button>
    <br/> <br/>
    <button name="open" @click="opt('打开',$event)">打开</button>
    <br/> <br/>
    <button name="print" @click="opt('打印',$event)">打印</button>
</div>
<script>
    Vue.createApp({
        data() {
        },
        methods: {
            opt(name, event) {
                let opt = event.target.name
                let src = event.target.tagName
                alert('知道你点了 ' + opt + '(' + name + ') '
                    + src + ',我马上处理.')
            }
        },
    }).mount("#app")
</script>
2
3
4
5
6
7
8
9
10
11
12
13
14
15
16
17
18
19
20
21
输出结果为:

# 4 多事件处理
一个操作,多个函数响应,这便是多事件也。在 Vue3.0 中,这些函数都放在 @click 里并用逗号分隔即可。
这种处理方式,真的很赞,就像你转发分享这篇文章一样。
<!DOCTYPE html>
<html>
<head>
    <meta charset="UTF-8">
    <title>Vue3.0计算属性</title>
    <script src="vue.global.js"></script>
    <style>
        .menu {
            border: 1px solid darkgreen;
            width: 100px;
            height: 150px;
            padding-top: 20px;
            padding-left: 20px;
        }
    </style>
</head>
<body>
<div class="menu" id="app">
    <button @click="add(6),sub(3)">加减</button>
</div>
<script>
    let result = 0
    Vue.createApp({

        data() {
        },
        methods: {
            add(num) {
                result += num
            },
            sub(num) {
                result -= num
                alert('结果是:' + result) // 结果是:3
            }
        },
    }).mount("#app")
</script>
</body>
</html>
2
3
4
5
6
7
8
9
10
11
12
13
14
15
16
17
18
19
20
21
22
23
24
25
26
27
28
29
30
31
32
33
34
35
36
37
38
39
# 5 按键修饰符
不知你在用键盘输入多项内容之后,是否有按下回车键的习惯,如果没有,那证明你打字很慢,如果有,那证明你不是程序员,而是打字员(哈哈~~,什么鬼逻辑)。
在较完善的系统中,当用户按下回车键(或其他键)时,都会有响应的。为了解决这个问题,Vue 允许为 v-on 或者 @ 在监听键盘事件时添加按键修饰符。
Vue 为最常用的键提供了 .enter(回车) 、.tab 、 .delete (捕获“删除”和“退格”键)、.esc(取消) 、.up(上)、.down(下)、.left(左)、.right(右)等。
例如:@keyup.enter="submit"
<!DOCTYPE html>
<html>
<head>
    <meta charset="UTF-8">
    <title>Vue3.0计算属性</title>
    <script src="vue.global.js"></script>
    <style>
        .menu {
            border: 1px solid darkgreen;
            width: 100px;
            height: 150px;
            padding-top: 20px;
            padding-left: 20px;
        }
    </style>
</head>
<body>
<div class="menu" id="app">
    <button @keyup.enter="submit" @click="submit" type="submit">确定</button>
</div>
<script>
    let result = 0
    Vue.createApp({
        data() {
        },
        methods: {
            submit() {
                alert('你明明按下了回车键,别耍赖,赶紧分享文章')
            }
        },
    }).mount("#app")
</script>
</body>
</html>
2
3
4
5
6
7
8
9
10
11
12
13
14
15
16
17
18
19
20
21
22
23
24
25
26
27
28
29
30
31
32
33
34
# 表单输入
在 Vue3.0 中,事件处理用 v-on 指令,表单输入绑定则用 v-model 指令。
v-model 指令在表单 <input>、<textarea> 及 <select> 元素上创建双向数据绑定。它会根据控件类型自动选取正确的方法来更新元素。
# 1 文本输入
在 HTML 标签中,文本输入有单行(text)和多行(textarea)输入。
温馨提醒: v-model 会忽略所有表单元素的 value 的初始值而总是将当前活动实例的数据作为数据来源。你应该通过 JavaScript 该组件的 data 选项中声明初始值。
<!DOCTYPE html>
<html>
<head>
    <meta charset="UTF-8">
    <title>Vue3.0表单绑定</title>
    <script src="vue.global.js"></script>
</head>
<body>
<div id="app">
    <input v-model="msg" placeholder="单行输入"/>
    <p>单行输入结果: {{ msg }}</p>
    <hr style="background-color: #4CAF50;height: 1px"/>
    <textarea v-model="msg2" placeholder="多行输入"></textarea>
    <p>多行输入结果: {{ msg2 }}</p>
</div>
<script>
    Vue.createApp({
        data() {
            return {
                msg: '',
                msg2: ''
            }
        }
    }).mount("#app")
</script>
</body>
</html>
2
3
4
5
6
7
8
9
10
11
12
13
14
15
16
17
18
19
20
21
22
23
24
25
26
27
# 1.1 文本框的 number 修饰符
template : `
            <div>
              {{message}}
              <input v-model.number="message" type="number" />
              <button @click="getMessage">获取文本内容</button>
            </div>
        `
2
3
4
5
6
7
在文本框元素中使用 v-model.number ,得到的结果是一个数字类型的值,而不是字符串。
# 1.2 文本框的 trim 修饰符
template : `
            <div>
              {{message}}
              <input v-model.trim="message" />
              <button @click="getMessage">获取文本内容</button>
            </div>
        `
2
3
4
5
6
7
在文本框元素中使用 v-model.trim ,得到的结果会去掉两端的空格、Tab、回车等特殊字符。
# 2 复选框 checkbox
在开发产品时,单个复选框常在勾选协议中见到。
# 2.1 单个 checkbox 与数据绑定
<!DOCTYPE html>
<html>
<head>
    <meta charset="UTF-8">
    <title>Vue3.0计算属性</title>
    <script src="https://unpkg.com/vue@next"></script>
</head>
<body>
    <div id="app">
        <input type="checkbox" v-model="checkboxFlag" />checkbox<br>
        <button @click="getCheckboxFlag">获取checkbox设置</button>
    </div>

<script>
  const app = Vue.createApp({     // 创建一个vue应用实例
  data() {
    return {
      checkboxFlag: true,
    }
  },
  methods: {
    getCheckboxFlag() {
       console.info(this.checkboxFlag)
    }
  },
  }).mount("#app")
</script>
</body>
</html>
2
3
4
5
6
7
8
9
10
11
12
13
14
15
16
17
18
19
20
21
22
23
24
25
26
27
28
29
当 checkbox 被选中时,值是 true,否则值是 false

# 2.2 自定义单个 checkbox 的值
<!DOCTYPE html>
<html>
<head>
    <meta charset="UTF-8">
    <title>Vue3.0计算属性</title>
    <script src="https://unpkg.com/vue@next"></script>
</head>
<body>
    <div id="app">
        <input type="checkbox" v-model="checkboxFlag2" true-value="选中" false-value="未选中" />checkbox<br>
        <button @click="getCheckboxFlag2">获取checkbox设置</button>
    </div>
<script>
  const app = Vue.createApp({     // 创建一个vue应用实例
    data() {
        return {
            checkboxFlag2: "选中",
        }
    },
    methods : {
        getCheckboxFlag2() {
        console.info(this.checkboxFlag2)
        },
    },
  }).mount("#app")
</script>
</body>
</html>
2
3
4
5
6
7
8
9
10
11
12
13
14
15
16
17
18
19
20
21
22
23
24
25
26
27
28
使用 true-value 和 false-value 自定义 checkbox 的值

# 2.3 一组 checkbox 与数据绑定
一组复选框,常在选择个人兴趣爱好等见到。复选框,单选时,绑定到布尔值,多选时,绑定到同一个数组。
<!DOCTYPE html>
<html>
<head>
    <meta charset="UTF-8">
    <title>Vue3.0计算属性</title>
    <script src="https://unpkg.com/vue@next"></script>
</head>
<body>
    <div id="app">
        <input type="checkbox" v-model="checkboxArr" value="football" />足球<br>
        <input type="checkbox" v-model="checkboxArr" value="basketball" />篮球<br>
        <input type="checkbox" v-model="checkboxArr" value="tableTennis" />乒乓球<br>
        <button @click="getCheckboxArr">获取checkbox设置</button>
    </div>
<script>
  const app = Vue.createApp({     // 创建一个vue应用实例
    data() {
        return {
            checkboxArr: [],
        }
    },
    methods : {
        getCheckboxArr() {
            console.info(this.checkboxArr)
        },
    },
  }).mount("#app")
</script>
</body>
</html>
2
3
4
5
6
7
8
9
10
11
12
13
14
15
16
17
18
19
20
21
22
23
24
25
26
27
28
29
30
一组 checkbox 与同一个数据 checkboxArr 绑定,得到的结果是一个数组

# 3 单选框(radio)
在开发产品时,单选按钮,用于多选一,在选择性别时常见。
# 3.1 一组 radio 与数据绑定
<!DOCTYPE html>
<html>
<head>
    <meta charset="UTF-8">
    <title>Vue3.0计算属性</title>
    <script src="https://unpkg.com/vue@next"></script>
</head>
<body>
    <div id="app">
        <input type="radio" v-model="radioValue" value="football" />足球<br>
        <input type="radio" v-model="radioValue" value="basketball" />篮球<br>
        <input type="radio" v-model="radioValue" value="tableTennis" />乒乓球<br>
        <button @click="getRadioValue">获取radio设置</button>
    </div>
<script>
  const app = Vue.createApp({     // 创建一个vue应用实例
    data() {
        return {
            radioValue: "tableTennis",
         }
    },
    methods : {
        getRadioValue() {
            console.info(this.radioValue)
        },
    },
  }).mount("#app")
</script>
</body>
</html>
2
3
4
5
6
7
8
9
10
11
12
13
14
15
16
17
18
19
20
21
22
23
24
25
26
27
28
29
30
radio 是单选(只能选择其中的一个),因此得到的值是一个 字符串

# 4 select
如果选择项很多,那可用多选下拉菜单 select,以节约布局空间。
# 4.1 select 与数据绑定
<!DOCTYPE html>
<html>
<head>
    <meta charset="UTF-8">
    <title>Vue3.0计算属性</title>
    <script src="https://unpkg.com/vue@next"></script>
</head>
<body>
    <div id="app">
        <select v-model="selectValue">
            <option value="football">足球</option>
            <option value="basketball">篮球</option>
            <option value="tableTennis">乒乓球</option>
        </select>
        <br>
        <button @click="getRadioValue">获取select设置</button>
    </div>
<script>
  const app = Vue.createApp({     // 创建一个vue应用实例
    data() {
        return {
            selectValue: "",
        }
    },
    methods : {
        getRadioValue() {
            alert(this.selectValue)
        },
    },
  }).mount("#app")
</script>
</body>
</html>
2
3
4
5
6
7
8
9
10
11
12
13
14
15
16
17
18
19
20
21
22
23
24
25
26
27
28
29
30
31
32
33
在 select 标签上使用 v-model 绑定数据 selectValue

# 4.2 select 的选项从数据获得
<!DOCTYPE html>
<html>
<head>
    <meta charset="UTF-8">
    <title>Vue3.0计算属性</title>
    <script src="https://unpkg.com/vue@next"></script>
</head>
<body>
    <div id="app">
        <select v-model="selectValue">
            <option v-for="item in selectOptionArr" :value="item.value">{{item.text}}</option>
        </select>
        <br>
        <button @click="getSelectValue">获取select设置</button>
    </div>
<script>
  const app = Vue.createApp({     // 创建一个vue应用实例
    data() {
        return {
            selectOptionArr: [
                {text: "足球", value: "football"},
                {text: "篮球", value: "basketball"},
                {text: "乒乓球", value: "tableTennis"}
            ],
        }
    },
    methods : {
        getSelectValue() {
            alert(this.selectValue)
        },
    },
  }).mount("#app")
</script>
</body>
</html>
2
3
4
5
6
7
8
9
10
11
12
13
14
15
16
17
18
19
20
21
22
23
24
25
26
27
28
29
30
31
32
33
34
35
使用 v-for 得到 option 元素,运用数组的形式,效果和上一小节一致。
# 4.3 select 的返回对象
<!DOCTYPE html>
<html>
<head>
    <meta charset="UTF-8">
    <title>Vue3.0计算属性</title>
    <script src="https://unpkg.com/vue@next"></script>
</head>
<body>
    <div id="app">
        <select v-model="selectValue">
            <option v-for="item in selectOptionArr2" :value="item.value">{{item.text}}</option>
        </select>
        <br>
        <button @click="getSelectValue">获取select设置</button>
    </div>
<script>
  const app = Vue.createApp({     // 创建一个vue应用实例
    data() {
        return {
            selectOptionArr2: [
                {text: "足球", value: {name:"football", text:"足球"}},
                {text: "篮球", value: {name:"basketball", text:"篮球"}},
                {text: "乒乓球", value: {name:"tableTennis", text:"乒乓球"}}
            ],
        }
    },
    methods : {
        getSelectValue() {
            console.info(this.selectValue)
        },
    },
  }).mount("#app")
</script>
</body>
</html>
2
3
4
5
6
7
8
9
10
11
12
13
14
15
16
17
18
19
20
21
22
23
24
25
26
27
28
29
30
31
32
33
34
35
option 绑定的数据 selectOptionArr2 中,value 是一个对象。这样 select 的返回值就是对应的对象。

# Vue3 小项目实战
用所学过的 Vue3.0 双大括号文本插值、条件、循环渲染指令、表单数据双向绑定、计算属性和事件响应等相关知识,来开发一个小项目,以此达到技术总结的意义。
# 1 产品列表
- 页面布局,用纯天然的
HTML+CSS就好了。 - 用插值和计算属性,输出产品总数量。
- 用
v-for循环渲染,输出产品信息。 - 用
v-if判断产品规格是否为空。 - 用
v-on(缩写@)进行事件绑定。
<!DOCTYPE html>
<html>
<head>
    <meta charset="UTF-8">
    <title>Vue3.0小项目实战</title>
    <script src="https://unpkg.com/vue@next"></script>
    <style>
        h1 {
            text-align: center;
            color: darkorange;
            margin-top: 30px;
        }

        .counter {
            text-align: center;
            margin-bottom: 5px;
        }


        table {
            width: 800px;
            margin: 0 auto;
            text-align: center;
        }

        td, th {
            border: 1px solid #bcbcbc;
            padding: 5px 10px;
        }

        th {
            background: #42b983;
            font-size: 1.2rem;
            font-weight: 400;
            color: #fff;
            cursor: pointer;
        }

        tr:nth-of-type(odd) {
            background: #fff;
        }

        tr:nth-of-type(even) {
            background: #eee;
        }

        .del {
            color: red;
        }

        input {
            border: 1px solid darkcyan;
            line-height: 25px;
            width: 200px;
            color: #000;
            font-weight: bold;
            margin-top: 5px;
            margin-left: 10px;
        }
    </style>
</head>
<body>
<div id="app">
    <h1>产品信息列表</h1>
    <div class="counter">共有<strong>{{ counter }}</strong>件产品</div>
    <table>
        <thead>
        <tr>
            <th>序号</th>
            <th>名称</th>
            <th>型号</th>
            <th>规格</th>
            <th>操作</th>
        </tr>
        </thead>
        <template v-for="(product,index) in products" :key="index">
            <tr>
                <td>
                    {{ index + 1 }}
                </td>
                <td>
                    {{ product.name }}
                </td>
                <td>
                    {{ product.type }}
                </td>
                <td>
                <span v-if="product.desc==''">
                 未填写规格
                </span>
                <span v-else>
                   {{ product.desc }}
                </span>
                </td>
                <td>
                    <button class="del" @click='del(index)'>删除</button>
                </td>
            </tr>
        </template>
    </table>
</div>
<script>
    // const { createApp } = Vue
    // createApp({...})
    Vue.createApp({
        data() {
            return {
                product: {
                    name: '',
                    type: '',
                    desc: '',
                },
                products: [
                    {name: '安卓手机', type: 'AZ321', desc: '6.8寸'},
                    {name: '苹果手机', type: 'PG222', desc: '4.8寸'},
                    {name: '安卓平板', type: 'PB666', desc: '9.8寸'},
                    {name: '二手电视', type: 'ER659', desc: '12寸'},
                    {name: '洗衣机', type: 'XY872', desc: '9.8斤'}
                ]
            }
        },
        computed: {
            counter() {
                return this.products.length
            }
        },

        methods: {
            //删除数据
            del(index) {
                this.products.splice(index, 1)
            }
        }
    }).mount("#app")
</script>
</body>
</html>
2
3
4
5
6
7
8
9
10
11
12
13
14
15
16
17
18
19
20
21
22
23
24
25
26
27
28
29
30
31
32
33
34
35
36
37
38
39
40
41
42
43
44
45
46
47
48
49
50
51
52
53
54
55
56
57
58
59
60
61
62
63
64
65
66
67
68
69
70
71
72
73
74
75
76
77
78
79
80
81
82
83
84
85
86
87
88
89
90
91
92
93
94
95
96
97
98
99
100
101
102
103
104
105
106
107
108
109
110
111
112
113
114
115
116
117
118
119
120
121
122
123
124
125
126
127
128
129
130
131
132
133
134
135
136
137
# 2 新增产品
在新增表单布局代码,实现新增产品功能的布局。
- 用
v-model指令,进行表单数据双向绑定; - 用
v-on(缩写@)进行事件绑定。 - 在
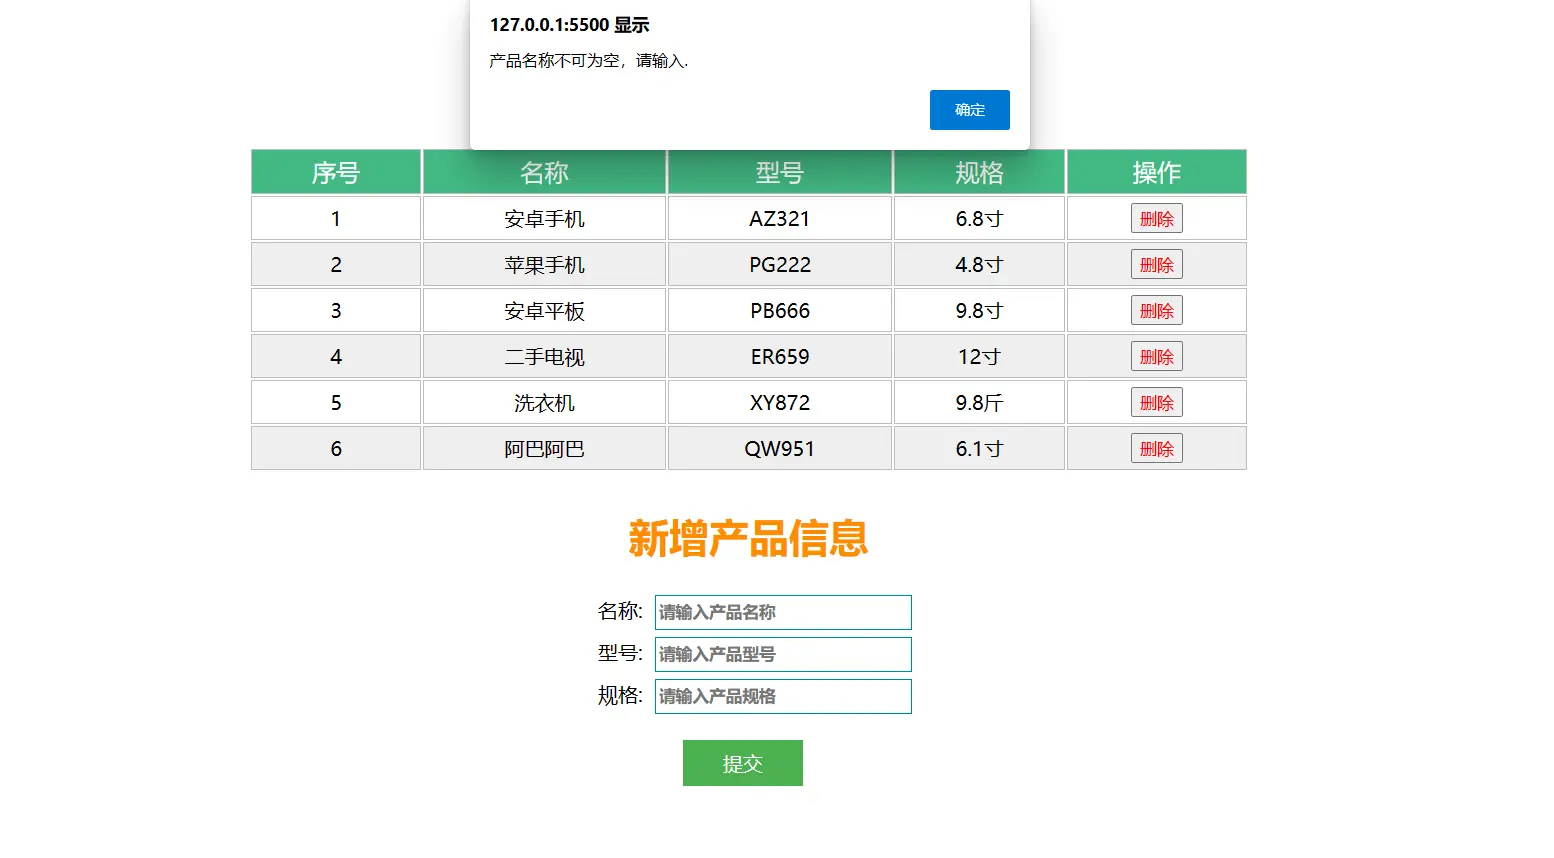
method里面添加add函数,进行表单是否为空校验,不通过就进行提示,通过就将信息添加到产品信息列表中。
<!DOCTYPE html>
<html>
<head>
    <meta charset="UTF-8">
    <title>Vue3.0小项目实战</title>
    <script src="https://unpkg.com/vue@next"></script>
    <style>
        h1 {
            text-align: center;
            color: darkorange;
            margin-top: 30px;
        }

        .counter {
            text-align: center;
            margin-bottom: 5px;
        }


        table {
            width: 800px;
            margin: 0 auto;
            text-align: center;
        }

        td, th {
            border: 1px solid #bcbcbc;
            padding: 5px 10px;
        }

        th {
            background: #42b983;
            font-size: 1.2rem;
            font-weight: 400;
            color: #fff;
            cursor: pointer;
        }

        tr:nth-of-type(odd) {
            background: #fff;
        }

        tr:nth-of-type(even) {
            background: #eee;
        }

        .del {
            color: red;
        }

        input {
            border: 1px solid darkcyan;
            line-height: 25px;
            width: 200px;
            color: #000;
            font-weight: bold;
            margin-top: 5px;
            margin-left: 10px;
        }

        .add {
            width: 800px;
            margin: 0 auto;
            text-align: center;
        }

        .addBtn {
            background-color: #4CAF50; /* Green */
            border: none;
            color: white;
            padding: 8px 32px;
            font-size: 16px;
            margin-right: 10px;
        }
    </style>
</head>
<body>
<div id="app">
    <h1>产品信息列表</h1>
    <div class="counter">共有<strong>{{ counter }}</strong>件产品</div>
    <table>
        <thead>
        <tr>
            <th>序号</th>
            <th>名称</th>
            <th>型号</th>
            <th>规格</th>
            <th>操作</th>
        </tr>
        </thead>
        <template v-for="(product,index) in products" :key="index">
            <tr>
                <td>
                    {{ index + 1 }}
                </td>
                <td>
                    {{ product.name }}
                </td>
                <td>
                    {{ product.type }}
                </td>
                <td>
                <span v-if="product.desc==''">
                 未填写规格
                </span>
                <span v-else>
                   {{ product.desc }}
                </span>
                </td>
                <td>
                    <button class="del" @click='del(index)'>删除</button>
                </td>
            </tr>
        </template>
    </table>
    <div class="add">
        <h1>新增产品信息</h1>
        <div style="margin-left: 10px">
            名称:<input name="name" type="text" v-model="product.name"
                      placeholder="请输入产品名称"/><br/>
            型号:<input name="type" type="text" v-model="product.type"
                      placeholder="请输入产品型号"/><br/>
            规格:<input name="desc" type="text" v-model="product.desc"
                      placeholder="请输入产品规格"/>
        </div>
        <br/>
        <button class="addBtn" type="submit" @click="add()">提交</button>
    </div>
</div>
<script>
    Vue.createApp({
        data() {
            return {
                product: {
                    name: '',
                    type: '',
                    desc: '',
                },
                products: [
                    {name: '安卓手机', type: 'AZ321', desc: '6.8寸'},
                    {name: '苹果手机', type: 'PG222', desc: '4.8寸'},
                    {name: '安卓平板', type: 'PB666', desc: '9.8寸'},
                    {name: '二手电视', type: 'ER659', desc: '12寸'},
                    {name: '洗衣机', type: 'XY872', desc: '9.8斤'}
                ]
            }
        },
        computed: {
            counter() {
                return this.products.length
            }
        },

        methods: {
            // 删除数据
            del(index) {
                this.products.splice(index, 1)
            },
            // 添加数据
            add() {
                if (this.product.name.trim() == '') {
                    alert('产品名称不可为空,请输入.')
                } else if (this.product.type.trim() == '') {
                    alert('产品型号不可为空,请输入.')
                } else {
                    this.products.push(this.product)
                    this.product = {}
                }
            }
        }
    }).mount("#app")
</script>
</body>
</html>
2
3
4
5
6
7
8
9
10
11
12
13
14
15
16
17
18
19
20
21
22
23
24
25
26
27
28
29
30
31
32
33
34
35
36
37
38
39
40
41
42
43
44
45
46
47
48
49
50
51
52
53
54
55
56
57
58
59
60
61
62
63
64
65
66
67
68
69
70
71
72
73
74
75
76
77
78
79
80
81
82
83
84
85
86
87
88
89
90
91
92
93
94
95
96
97
98
99
100
101
102
103
104
105
106
107
108
109
110
111
112
113
114
115
116
117
118
119
120
121
122
123
124
125
126
127
128
129
130
131
132
133
134
135
136
137
138
139
140
141
142
143
144
145
146
147
148
149
150
151
152
153
154
155
156
157
158
159
160
161
162
163
164
165
166
167
168
169
170
171
172
173
174
运行结果为:
# 自定义组件
在一个页面中,如果有代码重复的内容,那你可以将其抽出来,用 Vue 注册成局部组件;在一个 Web 系统中,如果有多个页面有共同的代码,那你可以将其抽出来,用 Vue 注册成全局组件。
组件可以扩展 HTML 元素,封装可重用的代码。让我们可以用独立可复用的小组件来构建大型应用。
其实,如果你用第三方现成的组件库的话,自定义组件,用得很少,甚至不用,但这是一个知识点,还是学一下比较好。
# 1 局部注册
在一个页面中,将其重复的内容抽出来,注册成组件,比如 <demo>。在需要用的地方直接引进 <demo></demo> 这个组件即可,以此来达到复用的目标。
<!DOCTYPE html>
<html>
<head>
    <meta charset="UTF-8">
    <title>Vue3.0组件注册</title>
    <script src="vue.global.js"></script>
</head>
<body>
<div id="app">
    <demo></demo>
    好多内容啊.........<br/>
    <demo></demo>
</div>
<script>
    // 创建一个Vue 应用
    const app = Vue.createApp({})

    // 定义一个名为 demo 的新页面组件
    app.component('demo', {
        data() {
            return {
                lang: "Vue3.0"
            }
        },
        template: `<span style="color: darkgreen">
        编程语言:{{ lang }}</span><br/>`
    })
    app.mount('#app')
</script>
</body>
</html>
2
3
4
5
6
7
8
9
10
11
12
13
14
15
16
17
18
19
20
21
22
23
24
25
26
27
28
29
30
31
运行结果:

# 2 全局注册
如果在整个 Web 系统中,有重复代码存在的话,那可以将共同的内容,放到一个 js 文件中。之后,在需要用到的页面进行引进即可。
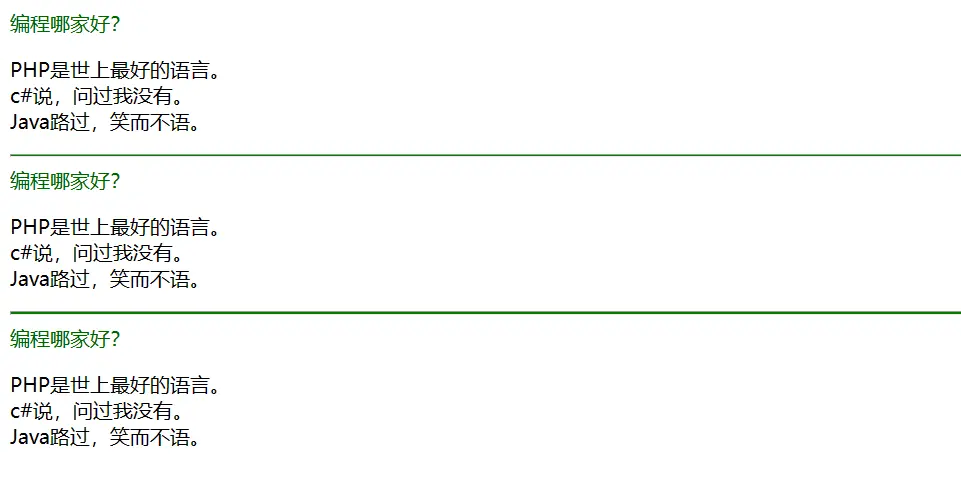
const ComponentA = {
    template: `<span style="color: darkgreen">编程哪家好?</span>
        <p>
          PHP是世上最好的语言。<br/>
          c#说,问过我没有。<br/>
          Java路过,笑而不语。
        </p>`
}
2
3
4
5
6
7
8
html 页面文件内容,注意引进 c.js 文件。'lang' -- <lang></lang>
<!DOCTYPE html>
<html>
<head>
    <meta charset="UTF-8">
    <title>Vue3.0组件注册</title>
    <script src="vue.global.js"></script>
    <script src="c.js"></script>
</head>
<body>
<div id="app">
    <lang></lang>
    <hr style="background-color:green;height: 1px"/>
    <lang></lang>
    <hr style="background-color:green;height: 1px"/>
    <lang></lang>
</div>
<script>
    const app = Vue.createApp({
        components: {
            'lang': ComponentA
        }
    })
    app.mount('#app')
</script>
</body>
</html>
2
3
4
5
6
7
8
9
10
11
12
13
14
15
16
17
18
19
20
21
22
23
24
25
26
运行结果为:
# 异步请求和侦听器
在 Web 技术栈中,异步请求是一直是神一样的存在。传统的网页不使用异步请求 (AJAX) 如果需要更新内容,必须重载整个网页面,消耗性能不说,用户体验大大的差。
AJAX = 异步 JavaScript 和 XML,是一种用于创建快速动态网页的技术。通过在后台与服务器进行少量数据交换,AJAX 可以使网页实现异步更新。这意味着可以在不重新加载整个网页的情况下,对网页的某部分进行更新。
由于 AJAX 是开发 Web 必备的,于是有人将其进行了封装,其中有一个和 Vue3.0 配合最好的家伙,叫作 axios。
# 1 axios 应用
- 引入 axios,不用什么脚手架,也不用什么 cdn,直接去 https://github.com/axios/axios (opens new window) 下载。
- 解压缩文件,找到 dist 文件夹,将
axios.min.js文件放到和 HTML 文件相同的目录下即可。 - 在要使用的页面中,加上
<script src="axios.min.js"></script>就好了。
<!DOCTYPE html>
<html>
<head>
    <meta charset="UTF-8">
    <title>Title</title>
    <script src="vue.global.js"></script>
    <script src="https://unpkg.com/axios@1.4.0/dist/axios.min.js"></script>

</head>
<body>
<div id="app">
    <p>{{ weather }}</p>
    <button @click="getWeather">获取成都天气信息</button>
</div>
<script>
    Vue.createApp({
        data() {
            return {
                weather: ''
            }
        },
        methods: {
            getWeather() {
                this.answer = '获取数据中..'
                axios
                    .get('http://wthrcdn.etouch.cn/weather_mini?city=成都')
                    .then(response => {
                        this.weather = response.data
                    })
                    .catch(error => {
                        this.weather = '获取不到:' + error
                    })
            }
        }
    }).mount("#app")
</script>
</body>
</html>
2
3
4
5
6
7
8
9
10
11
12
13
14
15
16
17
18
19
20
21
22
23
24
25
26
27
28
29
30
31
32
33
34
35
36
37
38
# 2 侦听器
在输入框输入数据时,有时候,你需要实时获取到用户输入的每一个字符,才好在后台进行相关处理,像搜索引擎就是这样的。
在 Vue3.0 中,侦听用户输入,使用 watch 方法。
文本框输入一个广字,后台调用天气查询接口,这时有可能返回广州,也有可能返回广平等含有广字的城市的天气信息。当输入广州时,会再去查询一遍。侦听器一监听到有内容变化,就会去调用天气查询接口,再次查询数据。
<!DOCTYPE html>
<html>
<head>
    <meta charset="UTF-8">
    <title>Title</title>
    <script src="vue.global.js"></script>
    <script src="axios.min.js"></script>
</head>
<body>
<div id="app">
    <p>{{ weather }}</p>
    <input v-model="city" placeholder="请输入城市名称"/>
</div>
<script>
    Vue.createApp({
        data() {
            return {
                weather: '',
                city: ''
            }
        },
        watch: {
            city(newCity, oldQuestion) {
                this.getWeather()
            }
        },
        methods: {
            getWeather() {
                this.weather = '查询' + this.city + '天气中..'
                axios
                    .get('http://wthrcdn.etouch.cn/weather_mini?city=' + this.city)
                    .then(response => {
                        this.weather = response.data
                    })
                    .catch(error => {
                        this.weather = '获取不到:' + error
                    })
            }
        }
    }).mount("#app")
</script>
</body>
</html>
2
3
4
5
6
7
8
9
10
11
12
13
14
15
16
17
18
19
20
21
22
23
24
25
26
27
28
29
30
31
32
33
34
35
36
37
38
39
40
41
42
43
# 组件库 element+
# 官网
一个 Vue 3 UI 框架 | Element Plus (element-plus.org) (opens new window)
element+ 是开源的前端组件库,有众多开发者在应用,是业界主流的 Web 端组件库之一。它有多个高质量组件,覆盖前端各类场景。性能极佳。组件体积小,支持主题定制和国际化等常用功能。element+ 可以友好的支持 Vue3.0。
# 1 安装 element+
虽然现在流行用 npm 命令、用所谓的脚手架创建项目,用命令行运行项目的方法,但我依然认为在学习阶段,应该怎么简单怎么来,最好不要在配置上浪费时间,消磨学习的兴趣。所以我推荐你直接用引入 CSS 和 JS 的方式。
<!DOCTYPE html>
<html>
<head>
    <meta charset="UTF-8">
    <title>ElementPlus组件库</title>
    <!-- Import style 引入样式文件 -->
    <link rel="stylesheet" href="//unpkg.com/element-plus/dist/index.css" />
    <!-- Import Vue 3 -->
    <!-- <script src="vue.global.js"></script> -->
    <script src="//unpkg.com/vue@3"></script>
    <!-- Import component library 引入组件库 -->
    <script src="//unpkg.com/element-plus"></script>
</head>
<body>
<div id="app">
    <el-row>
        <el-button>默认按钮</el-button>
        <el-button type="primary">主要按钮</el-button>
        <el-button type="success">成功按钮</el-button>
        <el-button type="info">信息按钮</el-button>
        <el-button type="warning">警告按钮</el-button>
        <el-button type="danger">危险按钮</el-button>
    </el-row>
</div>
<script>
    const app = Vue.createApp({});
    app.use(ElementPlus);
    app.mount("#app");
</script>
</body>
</html>
2
3
4
5
6
7
8
9
10
11
12
13
14
15
16
17
18
19
20
21
22
23
24
25
26
27
28
29
30
31
# 2 来点不一样的
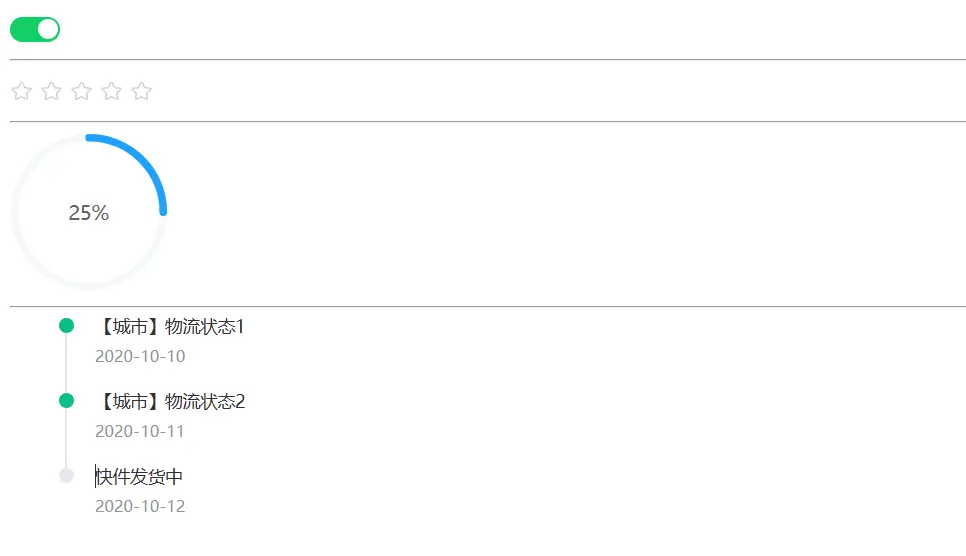
习惯了 HTML 的那些常规标签,总想找点不一样的,这下有了 element+,就可以实现了。我们来个不一样的选择标签,来个评分打星标签,再来一个物流进度时间线。
<!DOCTYPE html>
<html>
<head>
    <meta charset="UTF-8">
    <title>ElementPlus组件库</title>
    <!-- Import style -->
    <link rel="stylesheet" href="//unpkg.com/element-plus/dist/index.css" />
    <!-- Import Vue 3 -->
    <script src="vue.global.js"></script>
    <!-- Import component library -->
    <script src="//unpkg.com/element-plus"></script>
</head>
<body>
    <div id="app">
        <el-switch v-model="v1" active-color="#13ce66" inactive-color="#ff4949">
        </el-switch>
        <hr />
        <el-rate v-model="v2"></el-rate>
        <hr />
        <el-progress type="circle" :percentage="25"></el-progress>
        <br /><hr />
        <el-timeline>
            <el-timeline-item v-for="(activity, index) in activities" :key="index" :timestamp="activity.timestamp"
                :color="activity.color">
                {{activity.content}}
            </el-timeline-item>
        </el-timeline>
    </div>
    <script>
        const app = Vue.createApp({
            data() {
                return {
                    v1: true,
                    v2: '',
                    activities: [{
                        content: '【城市】物流状态1',
                        timestamp: '2020-10-10',
                        color: '#0bbd87'
                    }, {
                        content: '【城市】物流状态2',
                        timestamp: '2020-10-11',
                        color: '#0bbd87'
                    }, {
                        content: '快件发货中',
                        timestamp: '2020-10-12'
                    }]
                }
            }
        });
        app.use(ElementPlus);
        app.mount("#app");
    </script>
</body>
</html>
2
3
4
5
6
7
8
9
10
11
12
13
14
15
16
17
18
19
20
21
22
23
24
25
26
27
28
29
30
31
32
33
34
35
36
37
38
39
40
41
42
43
44
45
46
47
48
49
50
51
52
53
54
运行结果:
# 电子地图
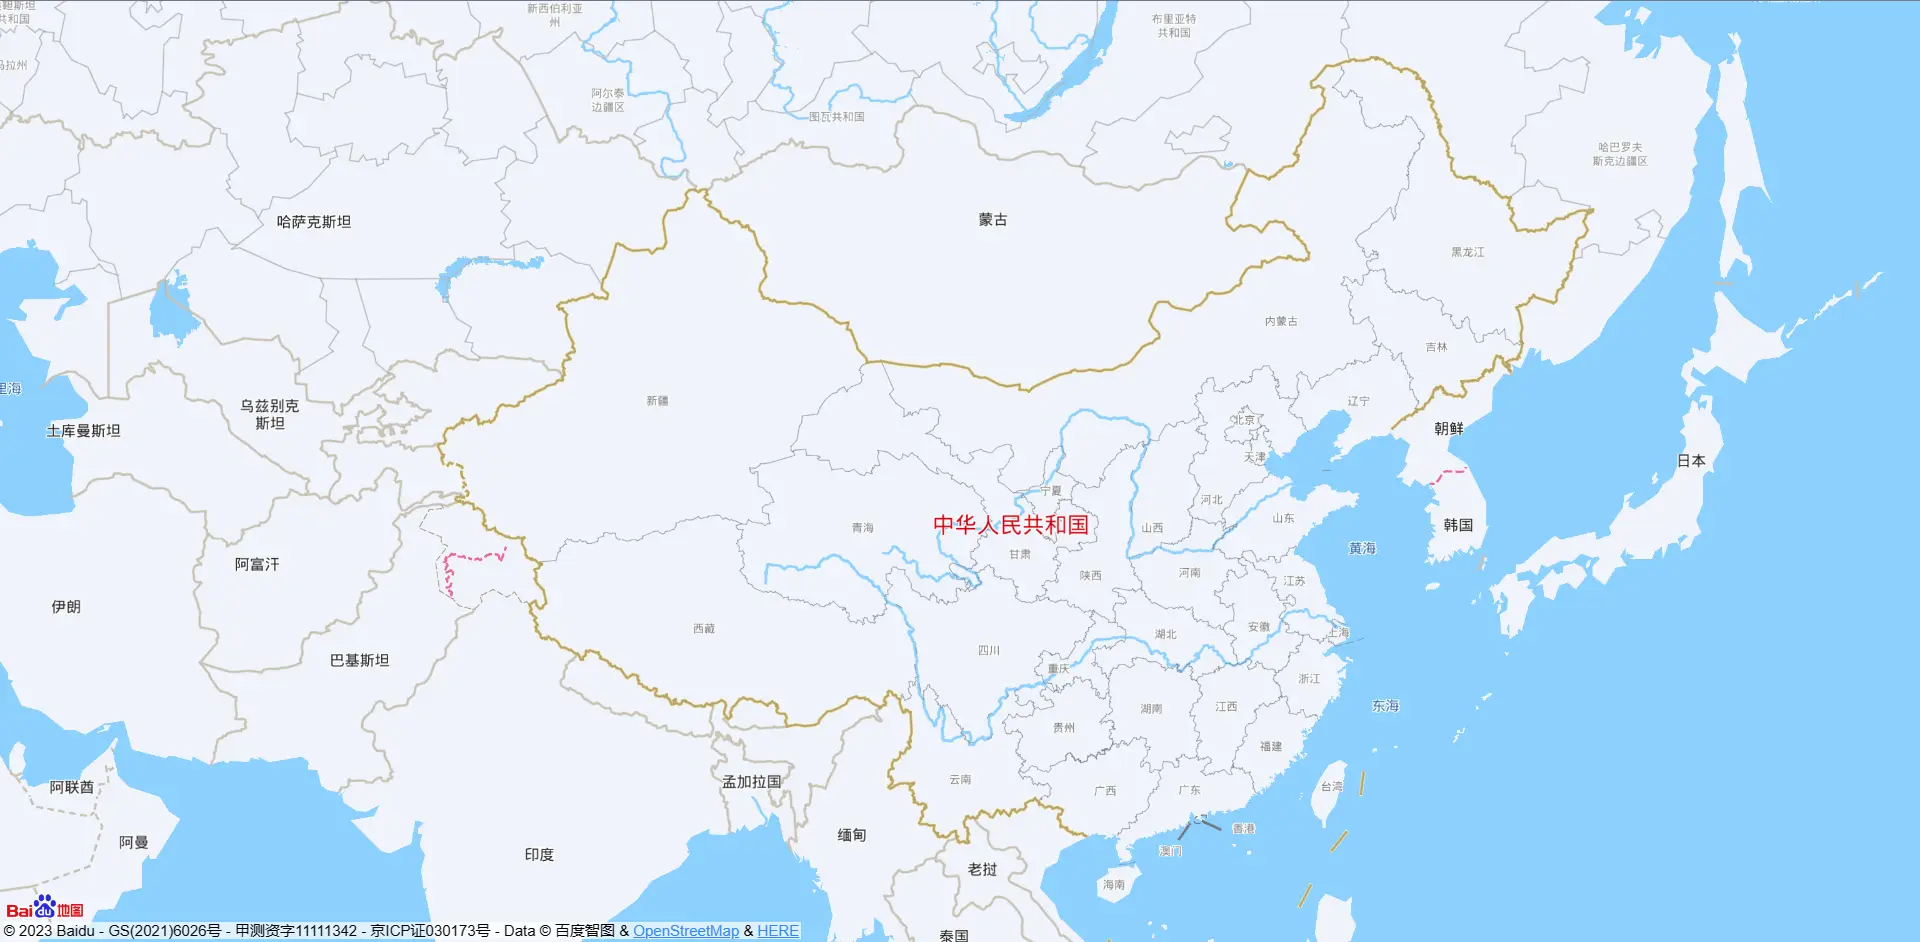
在大数据时代,用电子地图展示数据的需求,已成为常规需求。
其实,用电子地图,完全可以不用管 Vue 的,直接用 Javascript 就可以实现。
# 1 获取 Appkey
- 用你的百度账号,登录到百度 API key 的申请地址 https://lbsyun.baidu.com/apiconsole/key/create (opens new window)
- 登录成功后,如果没有直接导航到【创建应用】节点的话,就手动点击【创建应用】。(在控制台中)
- 填写应用名称:sales,应用类型:浏览器端。启用服务:全部勾上。Referer 白名单:填写半角*。
- 填写好后,点击【提交】按钮。
在返回的窗口中,会有 API key 这项内容,复制出来,保存在某个地方,稍后就会用到。
# 2 电子地图
代码里的 "你的key",改成你申请到的。仔细阅读代码,你会发现,这里和 Vue3.0 没半毛钱关系。
实现一个功能,看需求文档的要求,如果根本就不需要到 Vue3.0 的话,就不要硬用。好了,废话不多说,看代码吧。
<!DOCTYPE html>
<html lang="zh-CN">
<head>
    <meta charset="utf-8">
    <title>地图展示</title>
    <meta http-equiv="Content-Type" content="text/html; charset=utf-8">
    <meta name="viewport" content="initial-scale=1.0, user-scalable=no">
    <meta http-equiv="X-UA-Compatible" content="IE=Edge">
    <style>
        body,
        html,
        #container {
            overflow: hidden;
            width: 100%;
            height: 100%;
            margin: 0;
            font-family: "微软雅黑";
        }
    </style>
    <script src="//api.map.baidu.com/api?type=webgl&v=1.0&ak=C3DLtVXcGrWnRzFRg8QglHIst2M87Dfx">
    </script>
</head>
<body>
<div id="container"></div>
</body>
</html>
<script>
    var map = new BMapGL.Map('container');
    map.centerAndZoom(new BMapGL.Point(102.54, 30.05), 12);
    map.enableScrollWheelZoom(true);
</script>
2
3
4
5
6
7
8
9
10
11
12
13
14
15
16
17
18
19
20
21
22
23
24
25
26
27
28
29
30
31
# 组合式 API
Vue 3 的组合式 API 是一种新的 API 风格,用于编写 Vue 组件。
Vue 3 的组合式 API 基于函数式编程的思想,将组件的逻辑拆分为独立的功能单元,称为"组合函数"。这些组合函数可以通过 setup() 函数在组件中进行定义和使用。
使用组合式 API,可以将组件的相关逻辑聚合在一起,而不是按照选项属性(如 data、methods、computed 等)进行划分。这样可以更好地组织和管理组件的代码,使代码更具可读性和可维护性。
组合式 API 提供了以下几个主要的特性:
setup()函数:在组件中使用setup()函数来定义组合函数和其他响应式数据。setup()函数在组件创建之前执行,并且可以返回一个对象,该对象包含组合函数和其他数据。- 组合函数:组合函数是一种用于定义组件逻辑的函数。它可以包含数据、计算属性、方法等,并且可以使用 Vue 提供的响应式 API(如
ref、reactive等)来管理组件状态。 - 生命周期钩子函数:Vue 3 的组合式 API 引入了新的生命周期钩子函数,如
onMounted、onUpdated、onUnmounted等,用于在不同的组合函数中执行特定的操作。 - 自定义逻辑复用:通过将相关的组合函数提取为可复用的函数,可以在多个组件之间共享逻辑,并实现更好的代码复用性。
<!DOCTYPE html>
<html lang="en">
  <head>
    <meta charset="UTF-8" />
    <title>Vue 3 组合式 API 示例</title>
    <!-- <script src="https://unpkg.com/vue@next"></script> -->
    <script src="vue.global.js"></script>
  </head>
  <body>
    <div id="app">
      <p>当前计数值为:{{ count }}</p>
      <button @click="increment">增加</button>
      <button @click="decrement">减少</button>
    </div>

    <script>
      const { ref } = Vue;

      const app = Vue.createApp({
        setup() {
          // 使用 ref 定义 count 响应式数据
          const count = ref(0);

          // 定义增加计数的方法
          function increment() {
            count.value++;
          }

          // 定义减少计数的方法
          function decrement() {
            count.value--;
          }

          // 返回 count 和两个方法
          return {
            count,
            increment,
            decrement,
          };
        },
      });

      app.mount("#app");
    </script>
  </body>
</html>
2
3
4
5
6
7
8
9
10
11
12
13
14
15
16
17
18
19
20
21
22
23
24
25
26
27
28
29
30
31
32
33
34
35
36
37
38
39
40
41
42
43
44
45
46
